

People choose a backsplash from photographs. Tile, color, pattern all decided in an afternoon on Pinterest.
Then two decisions get made by somebody else, usually the installer, usually without discussion. The grout, and the exact point where the tile stops. Those are the decisions that determine whether the finished wall looks considered or improvised, and whether it still looks good in five years.
The tile is the easy part. This is about the rest of it.
The short answer
A kitchen backsplash costs roughly $30 to $75 per square foot installed, with most projects landing between $600 and $1,500 and averaging around $1,000.
Standard height is about 18 inches the gap between countertop and upper cabinets plus the area behind the cooktop, which is often taken higher.
Use unsanded grout for joints under 1/8 inch, which covers most backsplash tile. Consider epoxy grout in a kitchen, because it resists the grease and staining that make cement grout look tired.
And think hard before putting polished marble behind a gas range.
What it actually costs
The installed figure is the one that matters when pricing a kitchen backsplash, since material price alone is misleading a cheap tile in a difficult pattern can cost more to fit than an expensive tile in a simple one.
| Material | Cost per sq ft |
|---|---|
| Ceramic, machine-made | $2 – $20 |
| Ceramic, handmade | $20 – $30, up to $100 for hand-painted |
| Porcelain | $3 – $30 |
| Glass | $10 – $50 |
| Marble tile | $3 – $50 |
| Marble slab | $50 – $200 |
| Stainless steel | $20 – $30 |
| Other metals | $20 – $25 |
| Sheet material | $45 – $50 installed, around $5 as DIY |
| Solid slab matching countertop | $35 – $200 installed |
Labour. Doing it yourself saves roughly $10 to $15 per square foot, which on a typical 30-square-foot backsplash is $300 to $450. Whether that is worth it is addressed further down.
Measuring it. Multiply height by width in feet for each run of wall. Standard is the 18-inch band between counter and cabinets, plus the cooktop area. Most kitchens come in somewhere between 20 and 40 square feet.
Herringbone needs about 20 percent extra material. Every diagonal cut produces waste, and the offcuts are rarely reusable. Budget the overage or you will run short mid-job and discover the dye lot has changed.
What pushes the price up: electrical outlets and fixtures, patterns requiring many cuts, hard-to-reach areas, full-height installations, and awkward materials such as paper-faced glass mosaic.
Grout: the decision that ages the wall
This is the first of the two decisions, and on most kitchen backsplash jobs it is made in thirty seconds at the end of a quote.
Sanded or unsanded
The rule is joint width. Unsanded grout for joints 1/8 inch or less. Sanded for wider joints, up to about half an inch.
Most backsplash tile sits in the unsanded category, because narrow joints are the norm on wall tile.
The reason this matter is scratching. Sanded grout contains silica sand, and that sand scratches soft and polished surfaces marble, natural stone, and glass in particular. Grouting a glass mosaic with sanded grout permanently dulls the faces, and no amount of cleaning afterwards recovers it.
Test on a spare piece before grouting the wall. Five minutes, and it catches both scratching and pigment staining on absorbent tile.
Cement or epoxy
The second half of the question, and the one with real consequences in a kitchen.
Cement grout is standard, cheap and easy to work with. It is also porous, which means it absorbs grease, cooking splatter and staining and it needs sealing after it fully cures, then resealing periodically.
Epoxy grout resists chemicals, stains and moisture far better. It holds colour more consistently and does not need sealing.
The costs are real. Epoxy is more expensive, cures fast once mixed so you work against a clock, and is considerably harder to clean off tile faces if you are slow. It is a less forgiving material for an inexperienced installer.
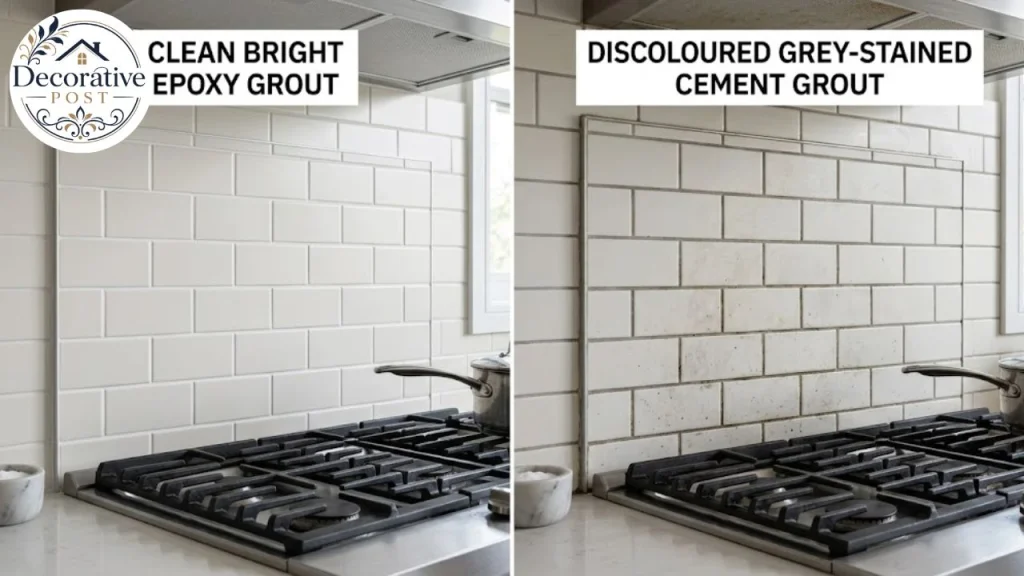
The honest recommendation for a kitchen: epoxy, particularly behind the cooktop and sink where splashing is constant. A kitchen is exactly the environment epoxy was formulated for, and the extra cost is small relative to the whole job.
If you use cement grout, seal it once cured and accept that it needs attention every year or two. Unsealed cement grout behind a range turns grey within a season, and that discolouration is what makes a four-year-old backsplash look tired while the tile itself is pristine.
Grout colour, which people get backwards
A matching grout makes the surface read as a single plane. A contrasting grout emphasises the pattern and the geometry.
Neither is wrong, but there is a practical bias nobody mentions: white grout behind a cooktop is a maintenance commitment. Mid-tone greys hide cooking splatter in a way white never will.
If you want the crisp white-grout look, use epoxy. It is the only version that stays white.
Where the tile stops: the second decision
The one that separates a professional-looking wall from an amateur one, and it is almost never discussed at the quoting stage.
Height
Standard is around 18 inches, filling the gap between countertop and upper cabinets. This is the default and it is a safe choice.
Above the cabinets is possible and rarely worth it; cabinet toppers are the better answer to that gap.
Full height counter to ceiling, or counter to underside of a wall cabinet with nothing above makes a stronger statement and costs more. It suits a feature wall or a kitchen with open shelving rather than cabinets.
Behind the cooktop is commonly taken higher than the surrounding run, up to the underside of an extractor or a shelf. This is functional as well as decorative, since that is where splashing actually happens.
The edges, which is where it goes wrong
Tile has to end somewhere, and that termination is a design decision with three main answers.
Metal trim profile. A proprietary edge trims the aluminums or anodized profiles sold for this purpose gives a crisp, deliberate line. Modern, and the most forgiving to install well.
Bullnose or finished-edge tile. A tile with one glazed, rounded edge. Traditional and clean, but you need the tile range to offer it, and many fashionable tiles do not.
Caulked raw edge. The cheapest option and the one that looks cheapest. An unglazed tile edge with a bead of silicone over it reads as unfinished, particularly in a good light.
Ask which your installer intends to use, and ask before the tile is ordered rather than after. Bullnose has to be bought with the main tile, and discovering on day three that the range does not offer it is how you end up with caulk.
The vertical termination matters too. A backsplash that stops at a cabinet edge reads cleanly. One that stops in the middle of a wall needs a logical line a corner, an edge of a window reveals, or a change of plane.
Drhomey Health
Drhomey Health provides helpful health tips, wellness advice, healthy lifestyle information, and practical guidance to support your everyday health and well-being.
Health Topices
Explore Health Topices for useful health information, wellness tips, nutrition advice, common health conditions, and practical healthy living guidance.
Roof Style
Discover Roof Style ideas, popular roof designs, roofing materials, and expert tips to help you choose the right roof style for your home.
Pro Roof Guard
Pro Roof Guard shares roofing protection tips, roof maintenance advice, leak prevention solutions, and helpful information for protecting your property.
Roofing Reviews
Explore Roofing Reviews to compare roofing companies, evaluate customer feedback, understand roofing services, and make informed contractor decisions.
Roof Yards
Roof Yards offers roofing ideas, roof design inspiration, material guides, and practical tips for durable and attractive residential roofing.
Iron Roof Works
Iron Roof Works explores iron roofing materials, metal roof designs, installation tips, maintenance advice, and durable roofing solutions for your property.
Outlets and switches
The practical detail that ruins otherwise good work.
Tiling adds thickness to the wall, which means existing outlet boxes end up recessed behind the new surface. The fix is a box extender, which is inexpensive and takes minutes.
Done properly, the cover plate sits flush against the tile. Done badly, the plate sits proud with a visible gap behind it, and every outlet in the run looks like an afterthought.
Plan the tile layout around outlets if possible, so cuts land in sensible places rather than slicing a tile into slivers. A good installer will do this unprompted; it is worth confirming that they intend to.
Electrical work beyond fitting an extender is a job for an electrician, not a tiler.
Materials, honestly assessed
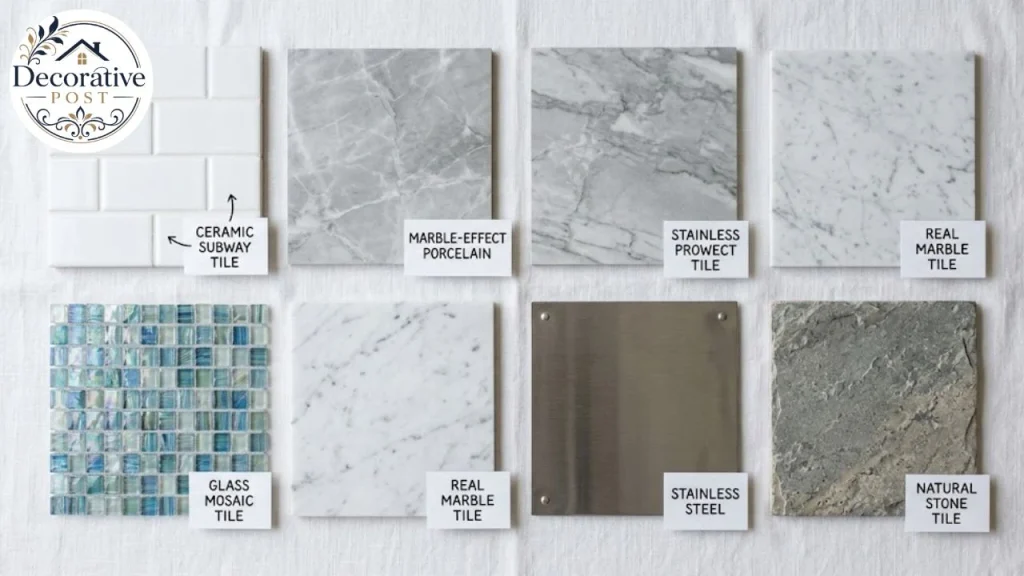
What each kitchen backsplash material is actually like to live with, rather than what it looks like in a photograph.
Ceramic. The default for good reason cheap, durable, waterproof, enormous range. Machine-made is the budget option; handmade carries variation that reads as character or inconsistency depending on taste.
Porcelain. A denser sub-type of ceramic, and it mimics wood, stone and metal convincingly. Harder and less porous than standard ceramic, which makes it a sensible choice in a working kitchen.
Glass. Reflective, bright, and excellent at bouncing light into a dark kitchen. Colour-backed glass is the cheapest version and harder to cut cleanly. Needs unsanded grout without exception, and shows every fingerprint near a frequently-used surface.
Natural stone. Beautiful and the most demanding. Porous, needs sealing, and vulnerable to the specific conditions of a kitchen which is the subject of the next section.
Metal. Stainless steel reads commercial and wipes clean effortlessly. Avoid softer metals such as aluminium near a cooktop, where heat and warping are genuine concerns.
Slab, matching the countertop. Running the counter material up the wall is the most expensive route and the cleanest look no grout lines at all, which solves the grout problem by eliminating it. Worth pricing if the budget allows.
Peel-and-stick and adhesive mats. Adhesive tile mats add roughly $2 per square foot on top of the tile and replace thinset. Genuinely useful for a renter or a quick refresh; not a substitute for a properly set tile wall in a kitchen you intend to keep.
Marble behind a range: a specific warning
Worth its own section, because it is the single most common regret in this category.
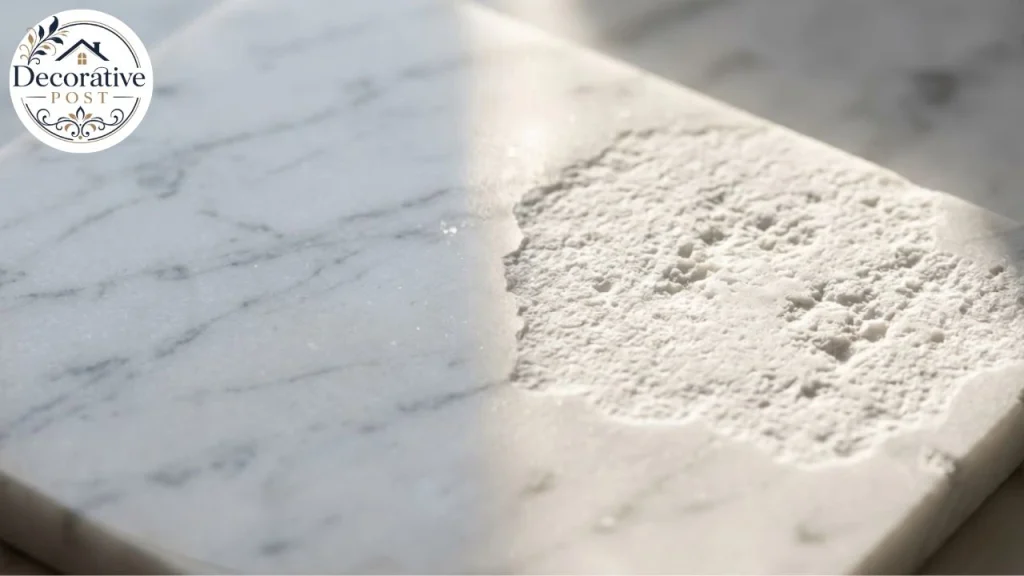
Polished marble behind a cooktop faces three problems simultaneously, and tile marble is no more resistant than slab.
Acid etching. Tomato sauce, vinegar, lemon juice and wine all etch marble. Etching is not a stain it is a dulled patch where the acid has reacted with the calcium carbonate, and cleaning does not fix it. It needs polishing out.
Grease staining. Marble is porous. Cooking oil penetrates, and the resulting dark patches are genuinely difficult to remove once established.
Sealing helps but does not solve it. A good impregnating sealer buys you time to wipe a splash before it penetrates. It does not make the stone acid-proof, and it needs reapplying.
If you want the marble look behind a range, porcelain that mimics marble is the sensible compromise. Modern porcelain reproductions are convincing at normal viewing distance and entirely indifferent to tomato sauce.
If you want real marble, put it on a run away from the cooktop and accept that it will develop a patina. Some people like that. Most people who chose it for a magazine look do not.
The same logic applies to other calcareous stones limestone and travertine behave similarly.
Choosing tile that works with what you already have
The design decisions that matter, in order.
Start from the fixed elements. Countertop, cabinets and flooring are already chosen or already there. The backsplash is the flexible element, and it should resolve those three rather than competing with them.
Decide whether it is a feature or a background. A busy countertop wants a quiet backsplash. A plain countertop can carry a patterned one. Both loud is a common and expensive mistake.
Look at the tile against your cabinets in the actual kitchen, in daylight and under the kitchen’s own lighting. Undercabinet lighting in particular changes tile colour dramatically, and most backsplashes are seen primarily under it.
Consider the paint. Wall color above the backsplash has to work with it, and the relationship is easier to resolve by choosing tile first and paint second. Our guide to how White Dove behaves in different light is relevant here, since a warm white beside a cool grey tile reads badly in a way neither does alone.
Think about the cabinets. If you are replacing them, do that decision first the ideas in our guide to modern kitchen cabinets cover how door style and finish set the direction for everything else in the room.
Account for the whole room. In an open-plan space, a bold backsplash is visible from the living area. The thinking in our coastal kitchen guide applies the palette has to work at a distance as well as at the counter.

DIY or professional
An honest assessment, because the saving on a kitchen backsplash is real and so is the risk.
What makes it feasible. The work is methodical rather than skilled. Setting out, buttering, placing, spacing, grouting. Adhesive mats remove the messiest part of the job, and a simple square tile in a straight pattern is genuinely achievable.
What makes it hard. Cutting around outlets, finishing edges properly, keeping long runs level, and working with unforgiving materials. Glass mosaic in particular is a poor first project.
Where DIY attempts usually show. The edges, the outlets and the grout. Those three details are what a trained eye reads immediately, and they are exactly the parts a first-timer gets wrong.
The sensible split. A straightforward ceramic subway tile in a simple running bond, on a kitchen without complications, is a reasonable weekend project for a competent person. Anything involving stone, glass mosaic, slab material, herringbone, or an awkward layout is worth paying for.
Renting, or not ready to commit
Two situations where a permanent tiled wall is the wrong answer, and both have workable alternatives.
If you rent. Peel-and-stick tile and adhesive-backed panels are genuinely good now, particularly the thicker vinyl and gel versions that have some depth rather than looking printed.
They go on over a clean flat wall, come off without damaging paint in most cases, and cost a fraction of tiling. Check your tenancy agreement first, and test removal on a small patch near a cabinet before committing to the whole run.
The limitation is heat. Most peel-and-stick products are not rated for the area directly behind a cooktop, and the adhesive fails there first. Leave that zone alone or use a dedicated heat-resistant panel.
If you are undecided. Painting the wall is the honest interim. A durable semi-gloss or a specialist tile paint in the backsplash zone looks intentional, wipes clean reasonably well, and costs almost nothing to change your mind about.
It will not survive behind a range long-term. But it buys you a year of living in the kitchen before committing several thousand to a permanent decision, and that year teaches you things no showroom visit will where splashing actually happens, how the light falls, whether the space wants a feature or a background.
Installation, in sequence
What should happen, so you can tell whether it is happening.
Surface preparation. The wall must be clean, flat, dry and sound. Old backsplash removal often damages the plasterboard beneath, and patching that properly is part of the job rather than an extra. Cover the floor properly while this happens our guide to cleaning hardwood floors covers what dropped thinnest and grout water actually do to a finish.
Setting out. The installer finds the center lines and plans the layout, so cuts fall in inconspicuous places and the pattern reads evenly. This is the step that distinguishes good work, and it happens before a single tile is stuck.
Adhesive. Twinset mortar applied with a notched trowel, or an adhesive mat. Full coverage matters voids behind tile cause cracking later.
Tiling. Working from the setting-out lines, with consistent spacers. Tiles are back-buttered on larger formats.
Curing. Adhesive needs time before grouting. Rushing this is a genuine cause of failure.
Grouting. Worked into the joints with a float, then cleaned off the faces before it sets. On epoxy this window is short.
Caulking. Silicone rather than grout at every change of plane the counter-to-tile joint, internal corners, and against the cabinet edge. These are movement joints, and grouting them causes cracking.
That last point is worth knowing because it is commonly got wrong. A rigid grout line where the countertop meets the tile will crack, because the two surfaces move independently. It should be flexible silicone in a colour matched to the grout.
Sealing. Natural stone and cement grout both need sealing after cure. Confirm whether this is included in the quote.
Keeping it looking right
Kitchen backsplash maintenance is minimal if the material choices were sound.
Wipe splashes promptly, especially on stone and especially behind the cooktop. Most permanent damage is a delay problem rather than a product problem.
Use the right cleaner. Avoid acidic cleaners on natural stone entirely vinegar is a common household cleaner and a bad idea on marble. A pH-neutral stone cleaner costs little and prevents etching.
Degrease rather than scrub. Cooking residue on a backsplash is grease, which responds to degreasing rather than abrasion. The same chemistry applies to any greasy household surface, including the sealant problems covered in our guide to cleaning shower mould. Scrubbing abrades grout and dulls polished tile.
Reseal on schedule. Cement grout and natural stone both need periodic resealing, and backsplashes need it more often than dry floors because of the exposure.
Deal with grout discolouration early. Grey grout behind a range can often be cleaned if addressed in the first year. Left longer it becomes permanent, at which point the options are regrouting or living with it.
If grout has failed beyond cleaning, raking it out and regrouting is a weekend job that transforms a tired wall without replacing a single tile. It is the cheapest meaningful kitchen improvement available.
Budget strategy
How to get the best result from whatever you have.
Under $500. Peel-and-stick or a simple ceramic subway tile, DIY, standard 18-inch height. Spend what you save on good grout and a proper edge trim.
$600 to $1,500. The typical range, and it buys a professionally installed ceramic or porcelain backsplash with epoxy grout and a decent edge finish. This is the sweet spot.
$1,500 to $3,000. Glass, handmade ceramic, or full-height installation. Or a standard tile with a more complex pattern.
$3,000 and up. Slab material matching the countertop, large-format stone, or specialist handmade tile.
Where to spend if the budget is tight: epoxy grout, a proper metal edge trim, and professional installation on the run behind the cooktop. Those three do more for the finished appearance than upgrading the tile.
If the kitchen is getting a wider refresh, the sequencing in our kitchen decor guide is worth reading before committing the budget to any single element.
Where to save: the tile itself. A well-installed inexpensive ceramic with good grout and crisp edges looks better than an expensive tile installed carelessly. That is the opposite of how most people allocate the budget.
Common mistakes
Choosing grout as an afterthought. It is half the visible surface and it determines how the wall ages.
Using sanded grout on glass or polished stone. Permanent scratching, discovered too late.
White cement grout behind a cooktop. It will not stay white. Use epoxy or a mid-tone.
Ordering without the bullnose. Decide the edge finish before the tile order, not after.
Polished marble behind a gas range. Etching and grease staining are near-inevitable.
Forgetting outlet box extenders. Cover plates standing proud of the tile, on every outlet in the run.
Grouting the countertop joint. It will crack. That joint takes flexible silicone.
Under-ordering on herringbone. Allow 20 percent extra, and buy it in one dye lot.
Choosing tile under showroom lighting. Look at it in your kitchen, under your undercabinet lights.
The sequence that gets it right
Settle the fixed elements first. Countertop, cabinets, flooring. The backsplash resolves those.
Choose the material, with the cooktop zone in mind specifically. Porcelain if you want the marble look behind heat.
Decide the height and the edge finish before ordering, and order the bullnose or trim at the same time.
Specify the grout type, color and whether it is epoxy. Put it in writing on the quote.
Confirm the detail work. Box extenders, silicone at the counter joint, sealing if applicable.
Order 20 percent extra, more for diagonal patterns, in one dye lot.
Keep the offcuts. A box of spare tile in the garage is what makes a future repair invisible, and the storage thinking in our guide to modern kitchen cabinets applies to finding somewhere sensible to keep it.
A good kitchen backsplash is almost never about finding a remarkable tile. It is about an ordinary tile installed with the grout, the edges and the terminations handled deliberately.
Those are the three things people notice without being able to say why. Get them right and a $2-a-square-foot ceramic looks deliberate. Get them wrong and marble looks like a mistake.
FAQs:
How much does a kitchen backsplash cost?
Roughly $30 to $75 per square foot installed, with most projects between $600 and $1,500 and an average near $1,000. Doing it yourself saves about $10 to $15 per square foot in Laboure.
What is the standard height for a kitchen backsplash?
About 18 inches, filling the gap between the countertop and upper cabinets, plus the area behind the cooktop which is often taken higher. Full-height installations run from counter to ceiling or to the underside of wall cabinets.
Should I use sanded or unsanded grout on a backsplash?
Unsanded for joints 1/8 inch or less, which covers most backsplash tile. Sanded grout contains silica that scratches glass, marble and polished surfaces permanently, so unsanded is the safer choice on those materials regardless.
Is epoxy grout worth it in a kitchen?
Generally, yes. It resists grease, staining and moisture far better than cement grout and needs no sealing, which matters most behind a cooktop and sink. The trade-offs are higher cost and a harder installation.
Can you put marble behind a stove?
You can, but it faces acid etching from tomato, vinegar and citrus, plus grease staining from cooking oil. Sealing slows absorption but does not prevent etching. Porcelain that mimics marble is the practical alternative.
How much tile should I order for a backsplash?
Measure height by width in feet for each run, typically 20 to 40 square feet for a kitchen, then add 20 percent for waste more for herringbone and diagonal patterns. Buy it all in one dye lot.
Can you install a kitchen backsplash yourself?
A simple ceramic tile in a straight pattern is a reasonable weekend project for a competent DIYer. Glass mosaic, natural stone, slab material and herringbone patterns are worth paying for, and the edges, outlets and grout are where inexperience shows.
What goes at the joint between the countertop and the tile?
Flexible silicone matched to the grout colour, never grout. The two surfaces move independently, so a rigid grout line there will crack.