

The instinct is to attack it immediately: hot water, a cloth, scrubbing. That instinct is wrong in almost every case, and it is how a removable lump of wax becomes a permanent greasy shadow.
Wax is not a stain in the way wine or coffee is. It sits on top of the fibres as a solid, and solids can be lifted off. Melt it into the weave with hot water first, and you convert a surface problem into an absorbed one.
There is also a second stain hiding inside the first, and the step most guides tell you to do will set it permanently.
The short answer
How to remove candle wax from fabric, in one line: harden the wax with ice or the freezer, scrape off what comes away, then melt the residue out through absorbent paper with a warm iron.
Treat whatever remains as a grease stain, and treat any colour left behind as a separate dye stain using diluted rubbing alcohol one part alcohol to two parts water.
Never put hot water on wax, never scrub it while soft, and read the fabric care label before you touch it.
Two stains, not one
This is the thing to understand before doing anything, because it changes the order of the work.
Spilled candle wax leaves behind wax, a solid that becomes a grease stain when melted, and often dye, the colourant in the candle itself, which behaves like any other dye stain.
They need opposite treatments. Wax responds to heat, because heat melts it into something absorbent paper can soak up. Dye responds badly to heat, because heat sets it.
So if you iron coloured wax on pale fabric, you remove the wax beautifully and set the dye permanently in the same motion. That is the single most common way these rescues fail, and almost no guide warns about it.
The order that works: get the wax off cold wherever possible, assess what colour is left, and only then decide whether heat is safe.
If the candle was white or unscented, you have one problem,m and the iron method is fine. If it was red, green, or deeply pigmented and the fabric is light, slow down.
Before you start: check three things
The care label. This decides everything downstream. Nothing below overrides a label that prohibits a treatment, and “dry clean only” means take it to a cleaner rather than improvising.
The fibre. This matters more than people expect, and it is covered properly further down. Alcohol, the standard dye treatment, damages acetate, triacetate, acrylic and modacrylic. On acetate, it must be diluted with two parts water.
An inconspicuous spot. Test every product on a seam allowance, an inside hem, or a corner you will never see. Colourfastness varies enormously between dye lots, let alone fabrics.
Thirty seconds of checking prevents the outcome where the wax comes out and takes the colour with it.
Harden it; do not rush it.
Let the wax set completely. If it is still liquid, leave it alone; anything you do now spreads it.
To speed this up, press ice cubes against the wax, ideally sealed in a plastic bag so meltwater does not soak the fabric. For a small item, the freezer works: twenty to thirty minutes is usually plenty.
Fully hardened wax becomes brittle and shears away from the fibres. Partly hardened wax smears, which doubles the size of the problem.
This is the step people skip because it involves waiting, and it is the step that determines how much work the rest of the job takes.
For something large, a tablecloth, a sofa cushion, a carpet, ice is the practical route. You are not trying to freeze the whole item, only the wax.
Scrape with the right tool.
Once the wax is hard, lift off everything that will come away mechanically. Every gram removed here is a gram you do not have to melt out later.
On sturdy fabrics like cotton, denim, canvas, or upholstery twill, a dull knife or a metal spatula works. Scrape away from your body, always.
On delicate fabrics like silk, satin, or fine wool, use the bowl of a spoon and skim across the surface rather than digging into it. A knife edge on silk makes holes, and a hole is worse than a stain.
On carpet and upholstery, a plastic credit card or a blunt knife is the right tool. Enough rigidity to lift the wax, not enough edge to cut pile.
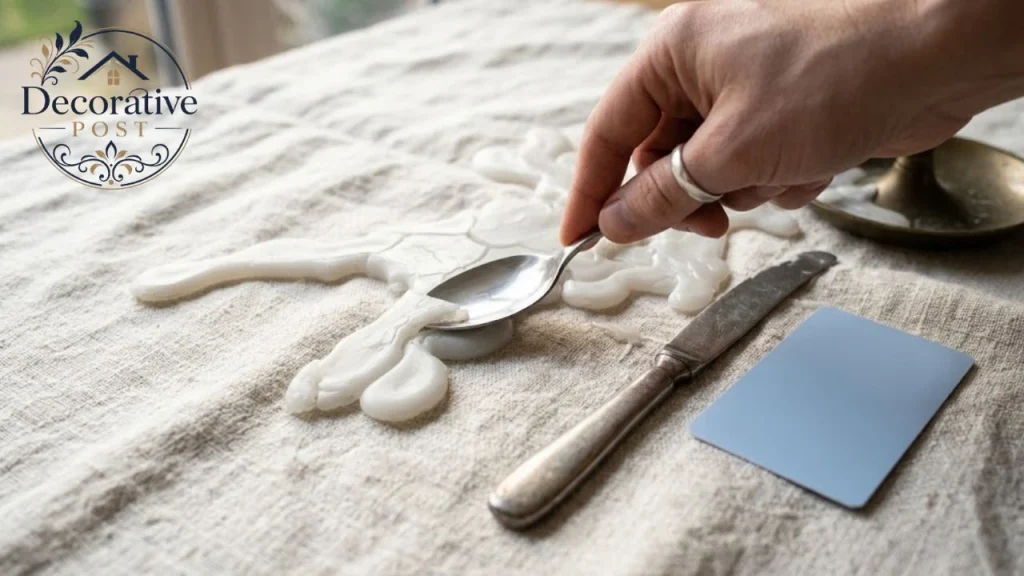
Work from the outside of the deposit inward. Starting in the middle pushes wax outward into clean fabric.
Do not chase the last traces. Once you are scraping fibres rather than wax, stop. The remainder comes out in the next step.
The iron and paper method
This is the core technique for removing wax from fabric, and it works remarkably well when done properly.
Lay the fabric on a hard, flat, heat-tolerant surface. An ironing board is fine; a towel-covered table is fine.
Place absorbent paper both above and below the waxy area. The lower sheet catches wax pulled through the weave; without it, you transfer the problem to your ironing board cover.
Cover the top sheet with a thin towel or pressing cloth, then iron through that, on a warm setting, not hot. You are melting wax, which happens at a low temperature, not pressing a crease.
Keep the iron moving and work in short passes. Holding it still in one place scorches the fabric and drives melted wax deeper rather than lifting it.
Rotate the paper as it absorbs. This is the part people get wrong: a saturated sheet stops absorbing and starts redepositing. Fresh paper every pass, as many times as it takes.
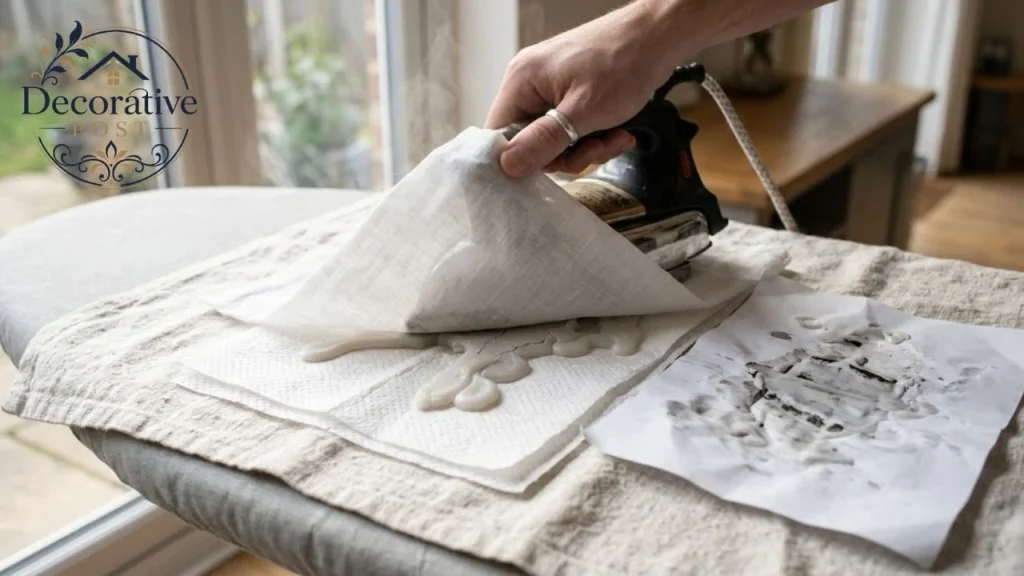
Press from the back of the fabric where you can. Heat applied to the reverse pushes the wax forward into the paper on the front, which is the direction you want it travelling.
Which paper to use
Plain white paper towel works for most sturdy fabrics. White-only printed or dyed paper can transfer colour under heat.
Blotting paper or a brown paper bag is better for fluffy fabrics. On fleece, wool and velvet, paper towel sheds tissue fibres that embed in the pile and are then their own problem.
A clean white cotton cloth is the alternative throughout, and it is reusable. An old pillowcase or tea towel does the job.
Never use newspaper. The ink transfers under heat, and you will have swapped a wax stain for a grey smudge.
If you cannot use an iron
Some fabrics and some situations rule it out. The alternatives are weaker but real.
A hair dryer on a low setting, held a few inches away, melts wax gradually while you blot with paper. Slower and less effective than an iron, but gentler and easier to control on something you are nervous about.
For an item you can soak safely, some people pour boiling water through the back of the fabric into a sink. This works on robust cottons and is a poor idea on anything with structure, dye instability, or wool content, which will felt.
The grease stain underneath
The wax is gone, and there is still a translucent patch. That is grease, and it needs a different approach.
Work a small amount of liquid laundry detergent directly into the mark with your fingers, or use a dedicated stain remover. Give it fifteen minutes to penetrate.
If detergent alone does not shift it, the standard textile guidance is to sponge the area with a commercial fabric or upholstery cleaner product based on petroleum distillates or hydrocarbons, then flush with water and let it dry fully.
A useful escalation for stubborn residue: a few drops of ammonia in diluted hand dishwashing detergent, applied while keeping the stain moist and blotting as you go. Flush thoroughly with water afterwards.
Never mix ammonia with chlorine bleach. The combination produces toxic chloramine gas, and a laundry room is exactly the kind of enclosed space where that matters. The same warning applies throughout the house — our guide to cleaning mould safely covers why product mixing is the most underrated household hazard.
The dye stain, handled properly
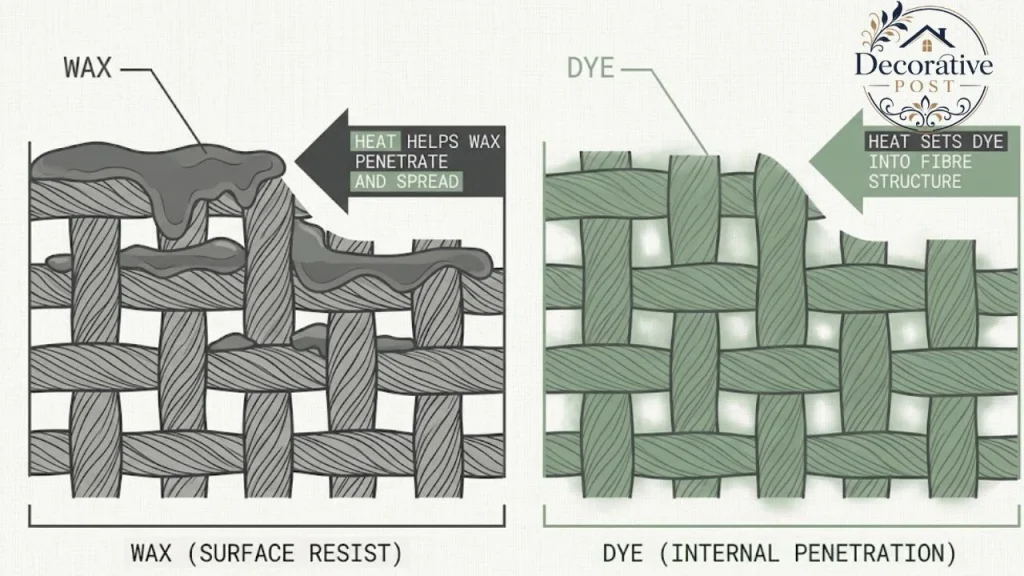
Now the part almost nobody covers, and the reason coloured candles cause so much trouble.
If colour remains after the wax and grease are dealt with, treat it as a dye stain. The established method is dilute alcohol: one part rubbing alcohol to two parts water.
Apply it sparingly; a dropper or a syringe gives you control that a soaked cloth does not, and blot after each application. Repeat rather than drenching.
Work from the outside of the stain inward, and blot rather than rub. Rubbing spreads dye and abrades fibres.
Then rinse with clean water to remove the alcohol.
The fibre warnings matter here. Alcohol damages acetate, triacetate, acrylic, and modacrylic. On acetate specifically, the dilution with two parts water is what makes it survivable. On acrylic and modacrylic carpet, skip the alcohol method entirely.
If the candle and the fabric are similar in colour, red wax on a dark red cushion, skip this step. You are risking the fabric to fix something nobody will see.
Launder it
Wash on the setting appropriate for that fabric, using a good detergent.
For white and colourfast washable items, hot water with chlorine bleach is effective if the label permits it. Where chlorine bleach is unsafe, sodium perborate bleach is the usual substitute.
Check the item before it goes in the dryer. This is the last point at which a mistake is reversible. Dryer heat sets any remaining grease or dye permanently, and a stain that survived the wash will survive forever once tumbled.
If something remains, repeat the pre-treatment and wash again. Two gentle cycles beat one aggressive one.
Air dry if you are unsure. It costs you a day and keeps every option open.
By fabric type
How to remove candle wax from fabric shifts with the material, and this is where most general guides stop being useful.
| Fabric | Approach |
|---|---|
| Cotton, linen, denim | Full method. Dull knife, warm iron, hot wash if the label allows |
| Silk, satin | Spoon, not knife. Low iron heat or hair dryer. Consider a professional cleaner. |
| Wool | Ice and scrape, blotting; paper, not tissue. Cool water only; heat felts wool. |
| Velvet, fleece, corduroy | Blotting paper only. Iron with a pressing cloth, never directly. Brush the pile afterwards |
| Polyester, nylon | Full method but keep the iron cool; synthetics melt |
| Acetate, triacetate | No alcohol undiluted. Low heat. Professional cleaning is the safer call |
| Acrylic, modacrylic | Avoid the alcohol method entirely |
| Dry clean only | Scrape the surface wax and take it in. Tell them what it is |
| Upholstery | Credit card to scrape, solvent sparingly, never soak the padding |
| Carpet | Ice in a bag, metal spatula, warm iron through paper, dilute alcohol for dye |
Tell a dry cleaner exactly what the stain is and what you have already tried. Unidentified stains get generic treatment; identified ones get the right solvent.
Carpet and upholstery, specifically
Different enough to warrant its own treatment, because how to remove candle wax from fabric changes once padding sits underneath it and overwetting becomes a real risk.
Harden the wax with an ice cube inside a plastic bag, so the carpet does not get wet. Scrape with a metal spatula on carpet, a plastic card on upholstery.
Fold paper towels over the remaining stain and press with a warm, not hot, iron, moving the blotter as it absorbs. The same rotate-the-paper rule applies.
Sponge any last traces with a commercial dry-cleaning solvent, then blot dry.
Use solvent sparingly. This is the warning that matters most on upholstery and carpet: overwetting damages backing and foam padding, and a delaminated carpet backing is a far more expensive problem than the stain was.
For remaining dye, the dilute alcohol method applies, applied by dropper and blotted between applications. Once dry, brush the pile to restore its direction.
If the spill happened on hard flooring nearby, that needs a different approach; our guide to cleaning hardwood floors covers what is safe on a finish and what dulls it.
Table linen, which is the usual casualty
Candles and tablecloths go together, which is why this is the most common version of the problem.
The advantage with table linen is that it is usually cotton or linen, usually washable, and usually robust enough for the full method including a hot wash.
Work on it flat rather than bunched. A tablecloth has enough fabric to accidentally transfer melted wax to three other places while you work on one.
Store table linen folded rather than crumpled once it is clean. The same organisation thinking in our guide to laundry room cabinets keeps creases out of the fabric you just rescued.
Deal with dripped wax before it reaches the overhang fold. Wax that has set across a fold cracks the fibres when you scrape it, and the crease holds residue.
Check both sides. Wax on a tablecloth usually penetrates, and a mark on the underside you did not treat becomes visible once laundered.
If you use candles on the table regularly, dripless tapers and a holder with a wide base prevent most of this. Our guide to table centrepiece ideas covers arrangements that keep flames away from fabric entirely.
What not to do
Each of these makes the problem worse, and all of them appear in online advice on how to remove candle wax from fabric.
Do not put hot water on it first. Hot water melts wax into the fibres, converting a liftable solid into an absorbed grease stain. This is the single worst thing you can do and the most intuitive.
Do not scrub soft wax. You are grinding it deeper and spreading it wider.
Do not use a hot iron. Wax melts at a low temperature. A hot iron scorches fabric, sets dye, and can melt synthetics.
Do not iron coloured wax on pale fabric without thinking. Get as much off cold as possible first, and accept that heat may set what remains.
Do not use newspaper or printed paper. Ink transfers under heat.
Do not use paper towel on velvet, fleece or wool. Tissue fibres embed in the pile.
Do not tumble dry until the stain is gone. Dryer heat makes it permanent.
Do not mix cleaning products. Particularly ammonia and bleach.
Do not soak upholstery or carpet in solvent. The padding and backing suffer more than the surface.
Why wax behaves the way it does
Brief, because understanding it explains every instruction above.
Candle wax paraffin, soy, beeswax is a solid at room temperature and a liquid at fairly low heat. That low melting point is the whole opportunity: gentle warmth liquefies it, and liquid wax wicks readily into absorbent paper.
It is also hydrophobic. Water will not dissolve it, which is why washing alone fails and why the pre-treatment is not optional.
Once melted into fibre, it behaves as a grease stain, which is why detergent and solvents enter the picture at that stage rather than at the start.
The dye is a separate chemistry entirely- water-soluble or alcohol-soluble depending on the colourant, and heat-set like most dyes. Treating two different problems with one method is why so many attempts half-work.
Different waxes vary slightly. Beeswax is harder and scrapes off more cleanly. Soy is softer and tends to need more ironing. Paraffin sits in between. Scented waxes carry oils that leave more residue.
A note on scented and speciality waxes
Not all candle wax behaves identically, and the differences change how much work you are in for.
Paraffin is the standard and the most predictable. It hardens firmly, scrapes cleanly, and melts out readily. Most of the advice above assumes paraffin.
Beeswax is harder and has a higher melting point. It shatters off beautifully once cold, but needs slightly more heat in the ironing stage. Worth a little more patience and a little more paper.
Soy wax is softer and stickier. It rarely scrapes off completely and leaves more behind for the iron to lift, so expect two or three more passes than you would with paraffin.
Scented candles carry fragrance oils alongside the wax. Those oils are the reason a scented spill leaves a faint ring even after the wax itself is gone, and they need the degreasing step more than an unscented spill does.
Gel candles are the difficult case. The gel base behaves less predictably than wax and does not always harden usefully. Scrape what you can cold, then treat the remainder as a grease stain rather than expecting the iron method to work.
Dyed pillar candles are the worst offenders for the dye problem, because the colourant is distributed through the whole body rather than just a surface coating.
If you are unsure what you are dealing with, check the candle packaging before starting. It takes a moment,nt and it tells you whether to expect a clean scrape or a long session with the iron.
When to stop and take it to a professional

Knowing how to remove candle wax from fabric yourself covers most situations. These are the ones it does not.
Anything labelled dry clean only. Scrape the surface wax and hand it over.
Silk, fine wool, and tailored garments. The risk of a water mark or a heat shine exceeds the cost of professional cleaning.
Antique or heirloom textiles. One attempt is all you get, and it should not be your first.
Large areas on fitted upholstery. A sofa you cannot remove the cover from is not a good place to learn, particularly on anything that was a considered purchase. Our notes on choosing home furnishings cover which upholstery fabrics tolerate cleaning and which do not.
Anything where you have already tried and made it worse. Tell the cleaner exactly what you used. It changes what they can safely apply.
A dry cleaner has solvents and equipment that are not available domestically, and the cost of one item is almost always less than the cost of replacing it.
Preventing the next one
Cheaper than any of the above.
Use a holder with a wide base and a lip that catches drips. Most wax spills are a holder problem rather than a candle problem.
Keep candles away from draughts. A flickering flame melts unevenly, and the pool spills over the edge.
Trim wicks to about a quarter inch before each use. A long wick produces a larger flame, a bigger melt pool,l and more drips.
Place a saucer, tray, or runner under candle groupings. A tray catches what a tablecloth absorbs.
Never move a lit candle. Carrying a burning candle with a full melt pool is how wax ends up on three surfaces instead of one.
Put candles out before the wax pool reaches the container edge, and keep them away from soft furnishings. The same spacing logic that makes a cozy living room feel considered also keeps flames clear of cushions and throws.
Scented candles and simmer pots do similar jobs with very different risk profiles; our simmer pot guide covers the version with no open flame and no wax at all.
The sequence, condensed
Stop. Do not touch it with water.
Harden. Ice in a bag, or the freezer for small items.
Scrape. Dull knife on sturdy fabric, spoon on delicate, credit card on upholstery.
Iron. Warm, through absorbent white paper above and below, rotating the paper every pass.
Degrease. Detergent worked in, fifteen minutes, then a solvent if needed.
De-dye. One part alcohol to two parts water, by dropper, blotting in between.
Wash. Appropriate setting, then check before drying.
Air dry if any doubt remains.
Learning how to remove candle wax from fabric properly is mostly a matter of patience in the first two minutes. Wait for it to harden, resist the hot water, and the rest is mechanical.
The thing people regret is rarely the spill. It is what they did in the thirty seconds after it.
FAQs:
Does candle wax come out of fabric permanently?
Usually yes, if treated correctly. Harden the wax, scrape it off, melt the residue out through absorbent paper with a warm iron, then treat the remaining grease and any dye separately before laundering. Check the item before tumble drying, because dryer heat sets whatever is left.
What is the fastest way to remove candle wax from fabric?
Press ice cubes in a plastic bag onto the wax until it hardens, scrape off as much as possible, then iron through a white paper towel on a warm setting, changing the paper as it absorbs. Finish with detergent on any remaining grease marks.
Will hot water remove candle wax?
No, and it makes things worse. Hot water melts wax into the fibres, turning a liftable solid into an absorbed grease stain. Always harden the wax first rather than applying heat or water.
How do you get coloured candle wax stains out?
Remove the wax first, then treat the colour as a separate dye stain using one part rubbing alcohol diluted with two parts water, applied by dropper and blotted between applications. Avoid ironing coloured wax on pale fabric where possible, since heat sets dye.
Can you remove candle wax without an iron?
Yes. A hair dryer on a low setting melts the wax gradually while you blot with absorbent paper. It is slower than an iron but easier to control on delicate fabric. Hardening and scraping first does most of the work either way.
How do you remove candle wax from upholstery or carpet?
Harden with an ice cube inside a plastic bag, scrape with a plastic card or metal spatula, then press with a warm iron through folded paper towels. Use solvent sparingly;y overwetting damages carpet backing and foam padding.
Does rubbing alcohol damage fabric?
It damages acetate, triacetate, acrylic,c and modacrylic. On acetate, it must be diluted with two parts water, and on acrylic or modacrylic carpet, the alcohol method should be avoided entirely. Always test on an inconspicuous area first.
Can a dry cleaner remove candle wax?
Yes, and it is the right choice for dry clean only labels, silk, fine wool, tailored garments,s and heirloom textiles. Tell them what the stain is and what you have already applied, because that determines which solvents they can safely use