

Most people do not go looking for this information because their heaters look dirty. They go looking because a room stopped getting warm or because the first cold morning of the year filled the house with a smell like scorched dust.
Unlike a fireplace hearth, a baseboard heater gives you no visual cue that something is wrong. Both of those symptoms usually trace back to the same thing. A baseboard heater works by pulling cool air in at the floor, warming it as it passes over metal fins, and letting it rise back into the room. Block those fins and the whole loop slows down.
The good news is that how to clean baseboard heaters is a forty-minute job with a vacuum. The part worth getting right is the order you do it in.
The short answer
How to clean baseboard heaters: shut off power at the breaker for electric units or close the zone valve for hot-water units, wait until the fins are cool to the touch, lift off the front cover, vacuum the fins with a brush attachment working top to bottom, straighten any bent fins with a fin comb, wipe the cover separately, and refit it.
Do this once before heating season and once after. Twice that if you have pets.
First, work out which kind you have
This determines the entire safety procedure, and almost no guide on how to clean baseboard heaters asks the question before giving instructions.
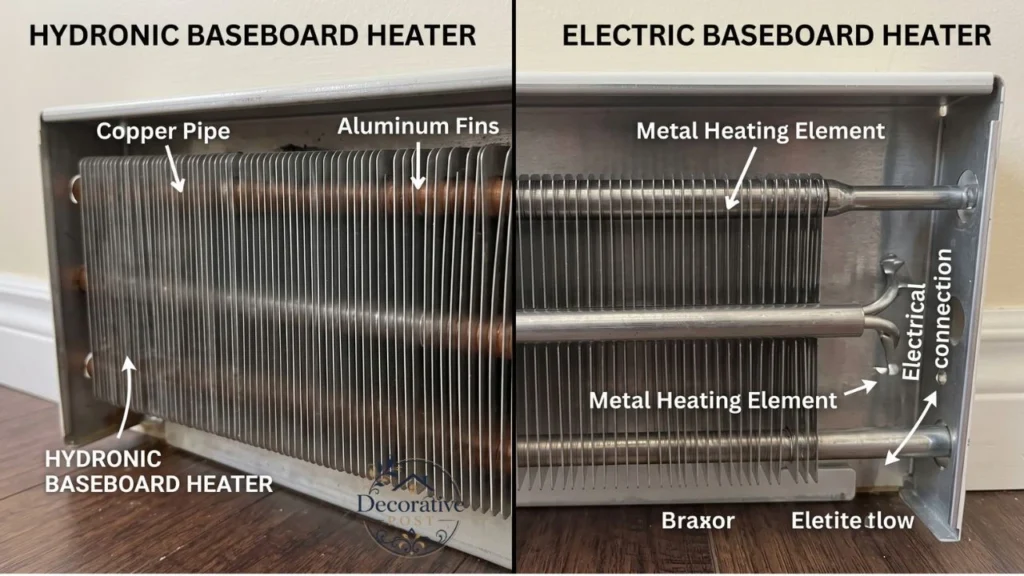
Hot-water (hydronic) baseboard. There is a copper pipe running through the middle of the aluminum fins. There is no thermostat on the unit itself, and the house has a boiler somewhere. The heat feels gentle, and the unit makes occasional ticking sounds as it expands.
Electric baseboard. There is a metal element rather than a copper pipe, often with a visible junction box at one end. Many units have a small thermostat dial built into the end cap. The house has no boiler.
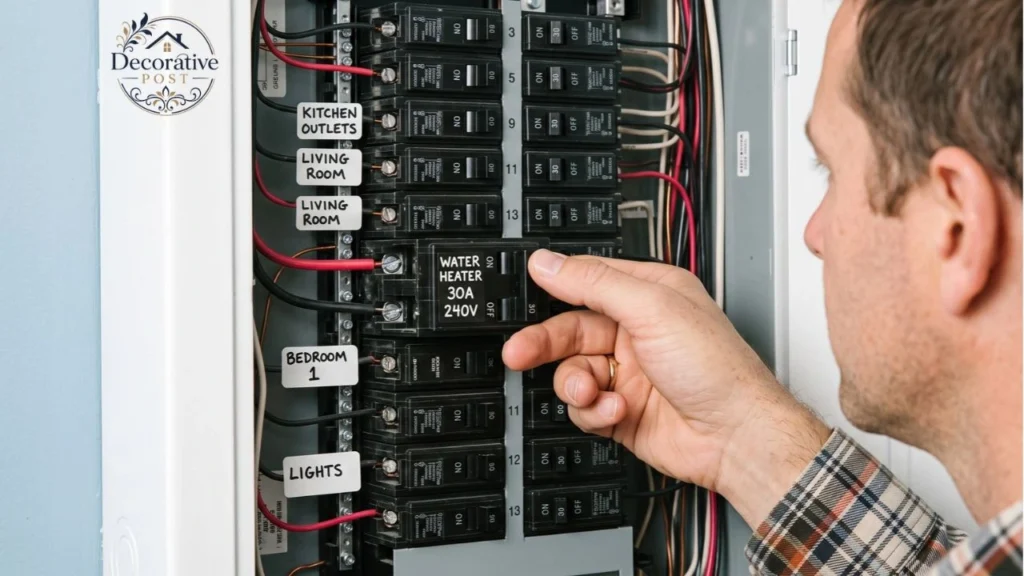
If you are still unsure, check the breaker panel. Electric baseboard heat needs dedicated 240-volt breakers, usually several of them, often labelled by room.
The difference matters because the hazard is different. Hydronic units can burn you but carry no electrical risk. Electric units carry both.
A quick note, because Google confuses these
If you searched for this and landed on articles about dish soap, microfibre cloths, and cotton swabs for corners, those pages are about baseboard trim and the painted wooden moulding where the wall meets the floor.
That is a different job. Soapy water is fine on painted wood. It is not fine anywhere near a heating element.
If your baseboards are wooden and warm to the touch only because the sun hits them, you want the trim guide. If there are metal fins behind a removable cover, you are in the right place.
What is actually inside a dirty heater
It is worth knowing what you are dealing with, because it changes how seriously most people take the job.
The obvious answer is dust, but dust is only part of it. What accumulates between the fins is a compressed mix of dead skin cells, pet dander, hair, carpet fibers, and pollen.
Anything that floats at floor level in your home ends up there eventually, because the heater spends the winter quietly drawing air across that exact zone.
In effect, a baseboard heater is a slow, gentle vacuum that never gets emptied. It runs for months, cycling the air in the room and depositing whatever it catches onto the fins.
That is why the autumn smell is worse in some houses than others. A home with two dogs and wall-to-wall carpet accumulates dramatically more than a flat with hard floors and no animals.
It is also why the efficiency argument is real rather than marketing. Fins that are packed rather than dusty genuinely restrict the convective loop the heater depends on, and the unit works harder for less output.
None of this is dangerous in itself. It is simply the difference between a heating system doing its job and one fighting its own intake.
Safety: do this part properly
The sequence below is not optional, and it differs by heater type.
For electric baseboard heaters:
Turn the thermostat off, then go to the breaker panel and switch off the breaker that feeds that heater. Turning it off at the thermostat alone is not enough the element stays live.
Verify it. Turn the thermostat back up and confirm the heater does not come on. A non-contact voltage tester held near the junction box is better still, and they cost very little.
Then wait. Roughly an hour is usually enough for an electric element that has been running.
For hot-water baseboard heaters:
Turn the thermostat for that zone right down, or close the valve at the end of the run if your system has one.
Hot water pipes hold heat far longer than an electric element. Give it two hours if the system has been running that morning.
For both, touch the fins with the back of your hand before putting a tool anywhere near them. The back of the hand is deliberate it pulls away reflexively instead of gripping.
Wear gloves. The fin edges are genuinely sharp, and a long run of them will find your knuckles.
A dust mask is worth it too. What you are about to release is a season’s worth of dander, hair, and carpet fiber.
What you actually need
You probably own most of it.
A vacuum with a brush attachment and a crevice tool. The brush is for the fins, the crevice tool for the floor of the housing.
A fin comb if you can get one they are sold at plumbing and HVAC suppliers for a few pounds or dollars. Needle-nose pliers work as a substitute.
A small, dry paintbrush for flicking debris out from between fins the vacuum cannot reach.
A microfibre cloth and mild detergent for the cover, plus gloves and a dust mask.
Compressed air is optional and genuinely useful for packed fins, but use it outdoors-facing or with the window open, because it relocates dust rather than removing it.
Getting the cover off
Most baseboard covers come off the same way, and they are easier than they look.
Start with the damper flap along the top. Open it fully so it is out of the way, and note which direction it was sitting.
Lift the front panel straight up about half an inch, then pull the bottom toward you. It should release from the mounting brackets without tools.
If it resists, look at the end caps. Some runs have caps that hold the panel in place, and they usually pull or unclip off first. A few older installations use screws.
Do not force it. A cover that will not come off is almost always one with an end cap or a screw you have not spotted, and bending the panel is how a tidy job becomes a replacement-cover job.
Set the cover somewhere flat. Leaning it against a wall is how covers get creased.
Cleaning the fins
This is the step in how to clean baseboard heaters that determines whether the job was worth doing.
Work the brush attachment down the length of the run, moving top to bottom so debris falls toward the floor of the housing rather than deeper into the fins.
Go gently. Aluminum fins bend under direct pressure from a hard plastic nozzle, and bent fins are exactly what you are trying to avoid.
Follow the direction of the fins, not across them. Dragging a nozzle sideways across a fin pack is the single most common way people damage them.
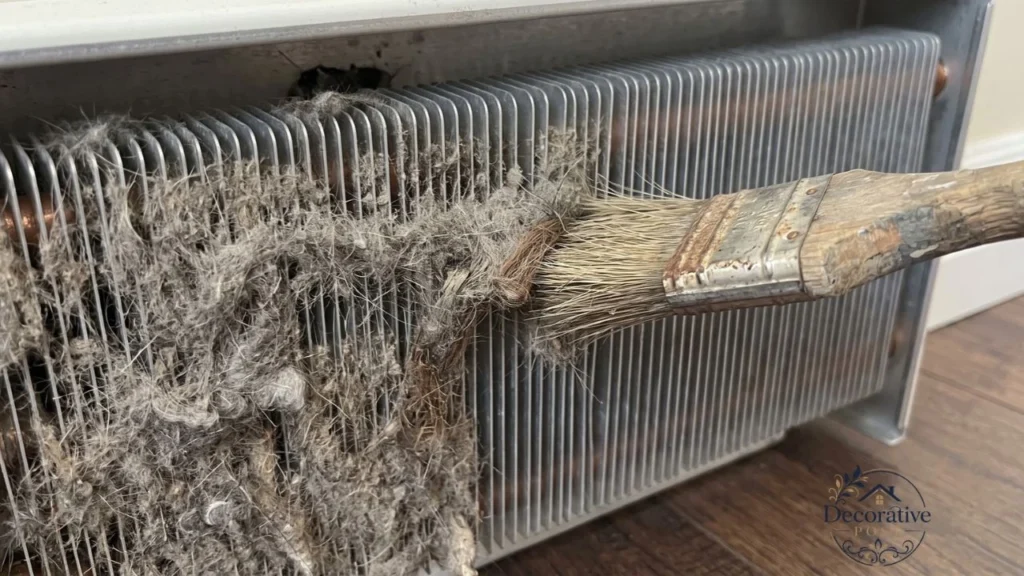
For dust that is packed rather than loose, use the dry paintbrush first to break it up, then vacuum again. Two passes with a brush beats one pass with more suction.
Then vacuum the floor of the housing with the crevice tool and the floor of the room underneath while you are down there. Whatever you dislodged has gone somewhere.
Finally, wipe any stubborn marks inside the housing with a barely damp cloth. Barely damp. Nothing wet goes near an electric element, even with the breaker off.
Straightening bent fins
Bent fins restrict airflow, and on an old unit there are usually more of them than you expect.
A fin comb is the right tool. Slide it gently between the fins and draw it along; the teeth push them back to parallel.
Needle-nose pliers do the job one fin at a time. Slower, but effective, and most people already own them.
Be less delicate than you expect. Fins are thin, but they are designed to be straightened, and you are unlikely to break one with reasonable hand pressure.
Work in short sections and check your progress by eye from the end of the run. Looking down the length of the fins makes bends obvious in a way that looking at them face-on does not.
When pet hair will not budge
This is the situation that defeats the standard advice, and it comes up constantly in households with dogs or cats.
Hair mats between the fins compress into something closer to felt than dust. Vacuuming slides straight over it.
Break it up mechanically first. A stiff, dry paintbrush, worked down between the fins, will lift the edge of the mat enough for the vacuum to get purchase.
Compressed air is the next escalation, and it works well on genuinely packed fins. Open a window, wear the mask, and accept that you are going to be cleaning the floor afterwards.
Some people have success with steam cleaners on hydronic units, which loosens the mat without mechanical force. Do not do this on an electric unit under any circumstances.
Pet households should be cleaning two to three times a year rather than once. The fins pack faster than most owners realize.
Covers, rust and paint
The cover is cosmetic, but it is also the part everybody sees, and it runs the full length of a wall you have probably spent time decorating.
Wash it separately, off the wall, with warm water and mild detergent. Dry it completely before refitting trapped moisture against metal is how rust starts.
If the paint is flaking or the cover is rusted, sand the affected area lightly and apply a rust-inhibiting primer before repainting.
The prep is the same discipline as any metal refinishing job our guide to painting furniture without sanding explains why adhesion fails when the surface is not properly degreased.
Use high-heat paint made for metal. Standard interior latex will blister, peel and give off an unpleasant smell as the metal expands and contracts. It can also become brittle and flake onto the element, which is a genuine fire consideration rather than a cosmetic one.
Never paint the fins themselves. Paint on the fins insulates them, which is the exact opposite of what they are for.
If you are refreshing the room anyway, replacing covers is one of the cheaper home upgrades with a visible result. Replacement covers are widely available by the section and are often cheaper than the time spent restoring a badly corroded one. Rust also signals a moisture source worth investigating.
Do not forget behind and underneath
The gap between the heater and the wall collects an extraordinary amount of dust, and it is the part most guides skip.
Use the crevice tool along the top edge and behind the unit. A folded microfibre cloth, pushed down with a paint stirrer, reaches what the vacuum cannot. The same principle applies to the floor itself our guide to cleaning hardwood floors covers the gap along the wall that most vacuums miss entirely.
Clear the floor area around the unit while you are there. Furniture, curtains and boxes pushed against a baseboard heater restrict airflow and are a recognized fire risk manufacturers specify minimum clearances for a reason.
If anything has been sitting against the heater, move it permanently. A blocked heater costs you output every day it stays blocked.
This is worth factoring in when you arrange a room. Sofa placement in a cozy living room and in an open entryway and living room combo often puts seating right up against the one wall carrying the heat.
How often to do this
| Household | Frequency |
|---|---|
| Standard, no pets, hard floors | Once a year, before heating season |
| Carpeted or high-dust home | Twice a year before and after the season |
| Pets | Two to three times a year |
| Allergies or asthma in the household | Twice a year minimum, plus monthly exterior vacuuming |
| Rental turnover | Every tenancy change |
It fits naturally into a broader routine of smart home maintenance, alongside the other jobs that are easier done before you need them.
The best time is late summer or early autumn, before the system fires up. Everything is cold, the job is comfortable, and you avoid the autumn burn-off entirely.
That burning smell on the first cold day is exactly what it sounds like: a season’s accumulation being incinerated on the element and distributed through the house. For most people it is an annoyance. For anyone with asthma or allergies, it is worth preventing.
Cleaned it and the room is still cold
Knowing how to clean baseboard heaters solves a lot of cold rooms, but not all of them. Here is what to check next.
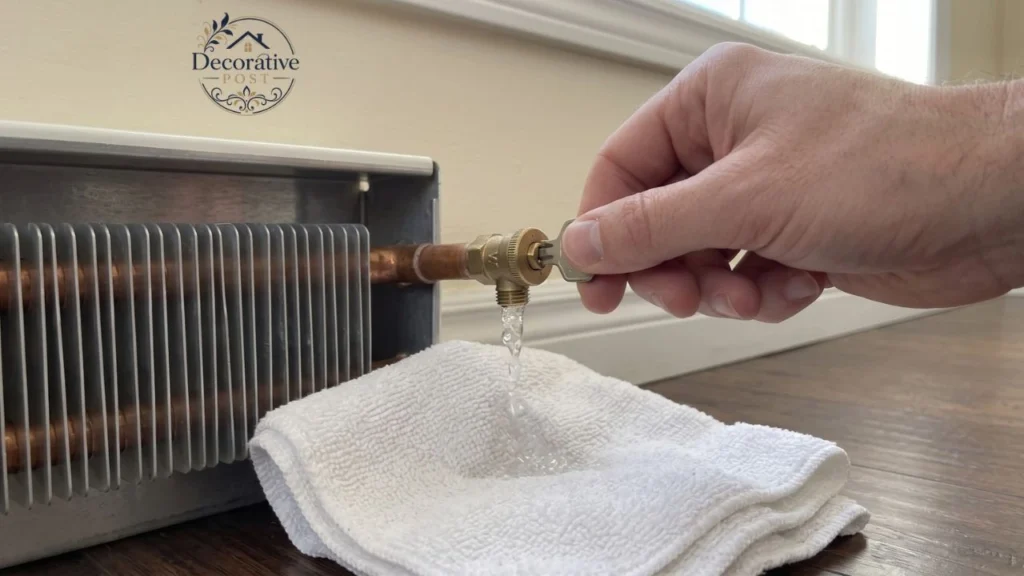
Hot-water systems: trapped air. If the first few feet of the run are hot and the rest is cool, air is sitting in the loop. Most systems have a small bleeder valve at the end of the run open it slowly with a cloth underneath until water rather than air comes out.
Half the run is cold. Same diagnosis on a hydronic system. On electric, it more often means a failed element section, which is not a DIY repair.
Nothing is warm anywhere in the zone. Check the thermostat first, then the breaker, then whether the zone valve is actually opening. Split-level layouts complicate this in a bi-level home the zones rarely map to the floors the way people assume. On a boiler system this is a technician’s call.
It heats but slowly. Check clearances. A sofa fifteen centimeters from a baseboard heater will strangle its output no matter how clean the fins are. Airflow obstruction causes the same complaint in reverse during summer, which is covered in our notes on getting a room with AC to hold temperature.
Knocking or banging sounds. Normal expansion ticking is fine. Loud banging in a hydronic system usually means air or a pipe binding where it passes through a joist, and neither is fixed by cleaning.
When to stop and call someone
Working through how to clean baseboard heaters yourself is straightforward, but there are findings that mean cover back on, breaker off, and phone in hand.
Scorch marks or discolored wiring inside an electric unit. Do not reset the breaker. That is an electrician’s job today, not next week.
Any frayed, brittle, or damaged wiring, or a loose connection at the junction box.
Water staining or active dripping on a hydronic unit. A leaking joint inside a wall cavity causes far more expensive damage than the leak itself.
A burning smell that persists more than an hour after a thorough clean. Normal burn-off dissipates. Something ongoing does not.
Rust is severe enough that the fins have deteriorated rather than just discolored at that point you are looking at replacement, not maintenance.
A note on rentals and older properties
If you rent, check your agreement before removing anything. Most tenancies treat routine cleaning as the tenant’s responsibility and anything beyond that as the landlord’s.
Vacuuming the exterior is always fair game. Taking covers off is usually fine too, but a heater that turns out to be faulty becomes a repair request, not a DIY project.
Older installations bring their own quirks. Covers painted over repeatedly by successive owners may be effectively glued shut, and forcing them will crease the panel.
Score the paint line along the top and bottom edge with a utility knife before lifting. It releases the seal without damaging the cover.
Very old hydronic runs sometimes have fins that have corroded rather than simply discolored. If they flake when brushed, cleaning will not restore output, and the element section needs replacing.
One more thing worth checking in an older property: whether the heater was installed below an electrical outlet. Current practice avoids this, and if you find one, mention it to an electrician rather than leaving it.
Five mistakes worth avoiding
Turning it off at the thermostat only. The element on an electric unit stays live. Use the breaker.
Dragging a nozzle sideways across the fins. Bends them every time. Follow their direction.
Using any liquid inside an electric unit. Barely damp cloths on the housing only, nothing near the element.
Painting covers with ordinary latex. It blisters, smells, and flakes onto the element.
Forcing a stuck cover. Find the end cap or the screw. A bent panel will never sit flush again.
The twenty-minute maintenance version
Once you have worked through how to clean baseboard heaters properly, keeping on top of it is trivial.
Once a month during heating season, run the vacuum’s brush attachment along the outside of the covers and the floor in front of them. Sixty seconds per room.
Check the clearances at the same time. Furniture migrates, curtains get longer, and boxes appear.
Once a year, do the full version described above cover off, fins out, comb, wipe, refit.
That is the whole maintenance schedule. It costs almost nothing, it keeps the rooms warmer than they would otherwise be, and it means the first cold morning of the year arrives without that smell.
FAQs
Do baseboard heaters need to be cleaned?
Yes. Dust, pet hair, and carpet fiber pack between the aluminum fins and restrict the airflow the heater depends on, reducing output. Accumulated debris also scorches on the element at start-up, sending particles into the room air.
How do you clean the inside of a baseboard heater?
Shut off power at the breaker (electric) or the zone valve (hydronic), let it cool, lift off the front cover, vacuum the fins with a brush attachment working top to bottom, break up packed debris with a dry paintbrush, straighten bent fins with a fin comb, then vacuum the housing floor.
How often should baseboard heaters be cleaned?
Once a year before heating season for most homes. Twice a year for carpeted or dusty homes, and two to three times a year with pets.
Why do my baseboard heaters smell like burning?
Dust and hair that settled on the element over the off-season is being burnt off at start-up. It normally clears within an hour or so. A smell that persists after a thorough clean should be investigated by an electrician.
Can you vacuum baseboard heater fins?
Yes, and it is the most effective method. Use a soft brush attachment, move along the direction of the fins rather than across them, and avoid pressing a hard nozzle against the aluminum.
How do you remove a baseboard heater cover?
Open the damper flap, lift the front panel about half an inch, then pull the bottom toward you to release it from the brackets. Some runs have end caps or screws that must come off first.
Can you paint baseboard heater covers?
Yes, using high-heat paint formulated for metal. Clean and lightly sand first, prime any rust, and never paint the fins themselves.
Do I need to turn off the breaker to clean an electric baseboard heater?
Yes. Switching off at the thermostat leaves the element live. Turn off the breaker and verify the heater will not activate before removing the cover.