

The measurement that ruins these purchases is not the one people check.
Everyone measures the width of the closet. Almost nobody measures the height to the shelf above, the depth including the vent elbow, or the swing of the closet door against an open washer door. Each of those has sent a delivered appliance back onto the truck.
There is also a harder limit worth knowing in the first paragraph rather than the fifteenth: if you own a top-load washer, nothing stacks on it. Not with a kit, not with a platform, not ever.
The short answer
A stackable washer dryer means two separate front-load machines, with the dryer secured on top of the washer using a model-specific stacking kit.
Full-size pairs are 27 inches wide and stack 74 to 80 inches tall. Compact pairs are 24 inches wide and stack 67 to 70 inches tall.
You need the brand’s own kit, matched to that cabinet family. You need around 5 inches behind for hookups and venting, an inch on each side, and roughly 50 inches of clear floor in front for the doors.
Only front-loaders stack, and here’s why
This is the single most common misunderstanding about the stackable washer dryer, and it costs people money before shopping even starts.
A top-load washer opens upward. Put a dryer on top of it, and the lid has nowhere to go. There is no engineering workaround;d the geometry simply forbids it.
So a true stacked setup requires a front-load washer, full stop. If you currently have a top-loader and want to stack, you are replacing both machines, not buying a kit.

The related trap is mixing brands. A dryer must be a compatible match from the same manufacturer and the same cabinet family, because the stacking kit’s brackets are designed to bolt to specific mounting points on specific chassis.
Mismatched widths or brands leave those brackets attached to nothing. Which brings us to the thing people try instead.
The improvised stack, and why not to
Search long enough,gh and you will find people stacking machines on plywood platforms, strapping them with generic ratchet straps, or shimming a mismatched dryer into place.
Do not. A washer in its spin cycle generates substantial lateral force, and an unsecured 130-pound dryer sitting five feet up is a genuine hazard rather than a theoretical one.
Beyond the safety issue, an improvised stack voids warranty coverage on both machines. The first failure becomes yours entirely.
It also fails on its own terms. Vibration amplifies with height, and a stack that is not rigidly coupled will walk, hum, and eventually damage the drum bearings in both units.
The brand kit exists for three reasons: it stops the dryer shifting, it manages vibration, and it keeps your warranty intact. It usually costs well under a hundred dollars, which is a poor thing to economise on.
Three products that get confused with each other
People use “stackable” loosely, and the three options behave very differently in the one way that matters: what happens when something breaks.
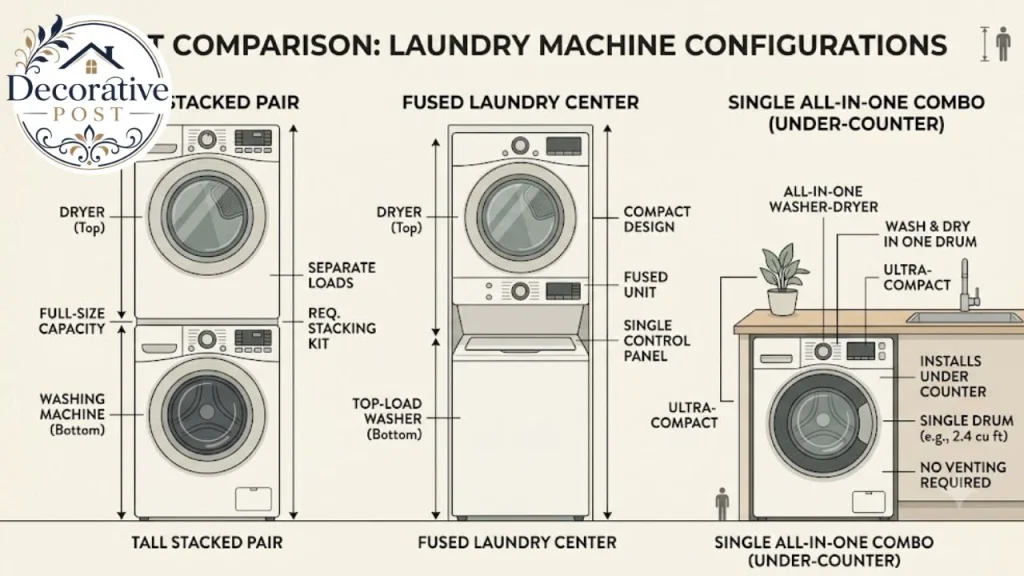
Stacked pair. Two independent appliances, bolted together. Full-size units are roughly 27 inches wide and 77 to 80 inches tall when stacked. If the dryer dies, you replace the dryer. This is the version worth buying when the space allows.
Laundry center. A small washer and dryer fused into a single cabinet, typically 70 to 76 inches tall. Narrower and simpler to install, with one serious drawback: a single failure can sideline both halves, and repair parts for the fused unit are less interchangeable.
All-in-one combo. One drum that washes and then dries, around 39 inches tall. It fits under a counter, needs no venting in most cases, and runs one load at a time through a very long cycle. Good for a studio flat, poor for a family.
| Stacked pair | Laundry center | All-in-one | |
|---|---|---|---|
| Height | 74–80″ | 70–76″ | ~39″ |
| Repair exposure | One unit at a time | Both halves | Whole machine |
| Capacity | Full-size available | Small | Small |
| Simultaneous wash + dry | Yes | Yes | No |
| Best for | Households with space above | Tight closets | Studios, one or two people |
The repair column is the one people underestimate at purchase and resent later.
The seven measurements to take before you shop
Write these down. Every one of them has killed a delivery.
Width of the opening. You need the machine width plus roughly an inch each side. A 27-inch pair wants a 29 to 30-inch opening minimum; published guidance puts the practical range at 30 to 33 inches.
Height to the lowest obstruction. Not the ceiling, the shelf, the cabinet, the sloped soffit, whatever is actually lowest. Full-size stacks run 74 to 80 inches with the kit installed, and the kit itself can add up to about an inch and a quarter.
Installation headroom. Separate from the finished height, and routinely forgotten. Someone has to physically lift a 120 to 140-pound dryer above waist height and set it onto the washer. In a closet with a shelf at 78 inches, that manoeuvre may be impossible even if the finished stack would fit.
Depth including hookups. The machine body is 31 to 34 inches deep on a full-size unit. Vent elbows and water connections add roughly 6 inches behind that. A 32-inch-deep closet does not hold a 32-inch-deep machine.
Door swing clearance. A front-load washer door needs 50 to 55 inches of clear floor in front to open fully. Check this against the closet door, against a hallway, and against anything the door would hit.
The delivery path. Doorways, stair turns, and the tightest corner between the front door and the closet. A 27-inch machine will not pass a 26-inch doorway, and these do not disassemble.
Controls and lint screen height. On a full-size stack, the dryer control panel sits 68 to 76 inches off the floor. Measure against the shortest person who will use it. A step stool in a narrow closet is not a solution; it is a hazard.
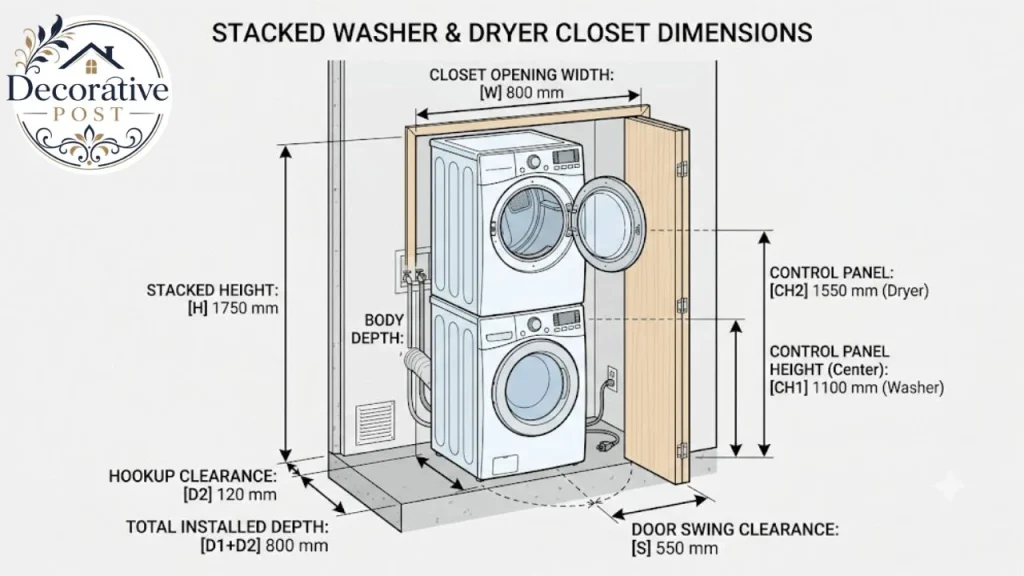
That seventh one gets dismissed and shouldn’t. Reaching above shoulder height to load wet laundry, every load, for ten years, is the complaint that shows up most often from people who are otherwise happy with their stack.
Full-size or compact
Every stackable washer dryer comes in one of two footprints. The decision follows the space, but the trade-offs are worth stating plainly.
Full-size, 27 inches wide. Body depth: 31 to 34 inches; each unit 38 to 39 inches tall, stacking to 74 to 80 inches. Washer capacities are commonly 4.3 to 5.0 cubic feet; dryers around 7.4.
This handles family laundry, bedding, towels, a week of clothes in two loads. If the space takes it, take it.
Compact, 24 inches wide. Body depth: 24 to 26 inches; each unit 33 to 34 inches tall, stacking to 67 to 70 inches. Capacities are roughly half the full-size equivalent.
Compacts are the answer for a genuine closet, an apartment, or anywhere the depth is restricted. The shallower body is often the deciding factor rather than the width.
The cost is capacity. A compact washer handles a comforter poorly or not at all, and a household of four will run noticeably more loads. Many compacts are also 120V ventless units with longer cycles, which compounds the throughput difference.
A useful rule: measure the depth first. Width eliminates some machines; depth eliminates more.
Matching capacity between the two machines
A detail that escapes most buyers: the washer and dryer in a stacked pair are not the same size inside, and they should not be.
Full-size pairs commonly put a 4.3 to 5.0 cubic foot washer under a 7.4 cubic foot dryer. That gap is deliberate. Wet laundry needs room to tumble, and a dryer matched exactly to its washer dries slowly and unevenly.
The working rule is a dryer roughly 1.5 to 2 times the washer’s capacity. Manufacturers pair them correctly within a cabinet family, which is another argument for buying the set rather than assembling one.
Where it matters practically: if you are replacing only the dryer in an existing stack, check the capacity against the washer rather than just the width. A same-size replacement will work but dry worse than the original.
Capacity also sets your real-world load count. A 4.5 cubic foot washer handles a king duvet; a 2.2 cubic foot compact does not, and no amount of persistence changes that.
Venting, and the ventless question
The dryer half of a stackable washer dryer has to put its air somewhere, and your options here shape everything else.
Vented. The standard arrangement. Hot, moist air ducts to outside, cycles are fast, and the machine is cheap to buy. It needs a duct run, which in a stacked closet means the vent elbow behind the dryer is part of that 6 inches of depth.
Keep the duct run short and the bends few. Rigid or semi-rigid metal duct, never the flexible foil kind, which collects lint and is a recognised fire risk.
Ventless condenser. Condenses moisture out of the air and drains it or collects it in a reservoir. No duct needed.
Ventless heat pump. The same idea, with a heat pump recovering the heat, which makes it substantially more efficient. Cycles run longer, often considerably longer than a vented dryer, and the purchase price is higher.
Ventless is the only option in many apartments and condos, and it is genuinely good technology now. Two things to know: cycle times are longer, and heat pump models dry at lower temperatures, which is gentler on clothes but slower on heavy items.
If you go ventless, plan the condensate. A model that drains to a standpipe is far better than one you empty by hand, because nobody empties a reservoir reliably for ten years.
Electrical and plumbing
Get this confirmed before you order, not on delivery day.
Electric dryers are usually 240V on a dedicated circuit, with either a three-prong or four-prong outlet depending on the age of the installation. Check which you have, because the cord is often sold separately and matched to the outlet.
Compact and many ventless dryers run on standard 120V, which is one of their significant advantages in older buildings and apartments.
Gas dryers need a gas connection plus a 120V outlet for the controls and drum motor. They dry fast and run cheap where gas is cheap.
The washer needs hot and cold supply and a drain, either a standpipe or a laundry sink. Check the standpipe height against the manufacturer’s specification; too low causes siphoning, too high strains the pump.
If the closet has a louvered or solid door, it needs air openings at the top and bottom. A dryer in a sealed closet starves itself of combustion or circulation air and underperforms badly.
Installation, honestly assessed.
Installing a stackable washer dryer is a two-person job at minimum, and a reasonable case for paying someone.
The sequence matters. Level the washer on all four feet first and check it with a spirit level in both directions. Any rocking at the bottom is amplified at the top of the stack, and a washer that was level enough on its own becomes a problem once a dryer sits on it.
Fit the stacking kit per the instructions, then lift the dryer into place. That lift is the part that goes wrong: 130 pounds, above waist height, in a confined space, with no room to adjust your grip.
Connect, then run an empty spin cycle at full speed and watch. A properly coupled stack barely moves. If it walks or hums loudly, the washer is not level, or the kit is not seated correctly.
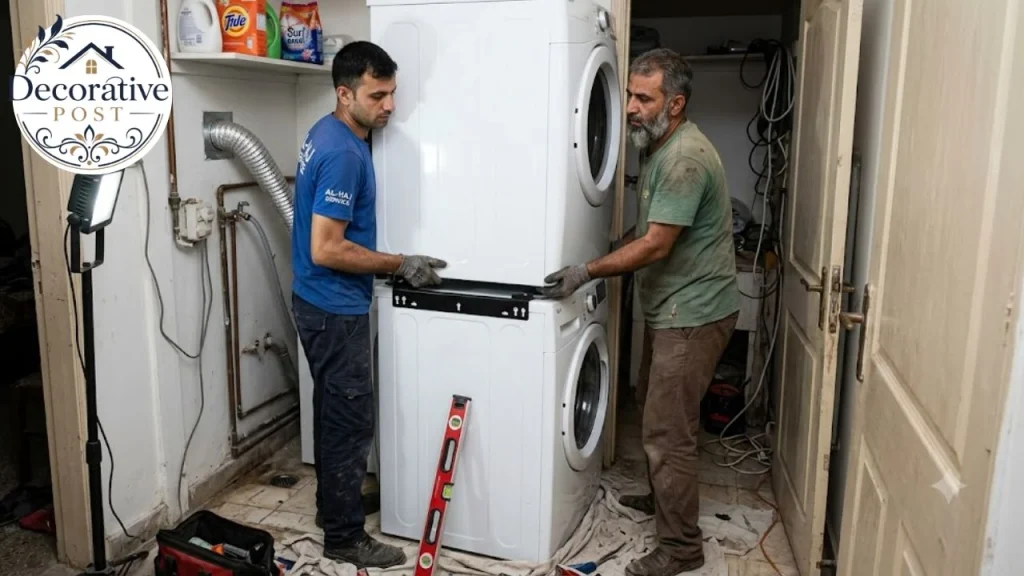
Where professional installation earns its fee: the lift, the 240V cord match, the vent connection, and the fact that a delivery crew will take the machine away again if it does not fit. A DIY install that does not fit becomes your freight problem.
Living with a stack
The practical differences between a stackable washer dryer and a side-by-side pair, after the novelty wears off.
No folding surface. Side-by-side pairs give you a counter. A stack gives you a wall. Plan for a folding surface elsewhere, or a pull-out shelf if the kit offers one; some compact kits include exactly that.
The lint screen is high. Clean it every load regardless. On a stack, it is easy to skip because reaching it is mildly annoying, and lint build-up is both an efficiency and a fire issue.
Transferring laundry is a lift. Wet laundry from a low washer into a high dryer is the daily reality of a stack. It is fine for most people and genuinely difficult for some.
Vibration travels. On an upper floor or a suspended timber floor, a stack transmits more vibration than a side-by-side. Anti-vibration pads under the washer feet help considerably and cost very little.
Access for service. A stacked pair has to be unstacked for some repairs. Factor that into the decision if the closet is tight enough that unstacking means pulling both units into the hallway.
Noise, and where it ends up
Stacks are louder in use than side-by-side pairs, and the reason is structural rather than mechanical.
The washer’s spin cycle generates vibration. In a side-by-side arrangement,t that energy dissipates into the floor across two separate machine footprints. In a stack,ck it travels up through the coupled chassis, and the dryer acts as a sounding board.
The fix is mostly at the bottom. Anti-vibration pads under the washer feet cost very little and make a noticeable difference, particularly on timber floors.
Levelling matters more than any accessory. A washer that is even slightly out of level transfers far more vibration, and the effect compounds with height.
Location matters too. A stack in a hallway cupboard shares a wall with a bedroom more often than people realise at planning stage, and a spin cycle at eleven at night carries further than expected through a stud wall.
If the laundry sits off a living area, this is worth thinking about alongside the rest of the room; the soft furnishings that make a cozy living room work also absorb a surprising amount of appliance noise.
Where a stack makes sense, and where it doesn’t
It makes sense in a laundry closet, a bathroom, a hallway cupboard, or any space where floor area is the binding constraint and you have vertical room.
It also makes sense in a small apartment where a ventless compact pair on 120V is the only configuration the building supports.
It does not make sense if the ceiling or shelf height cannot clear the stacked dimension plus installation headroom. That is a hard stop, not a problem to design around.
It also does not make sense if everyone in the household would be reaching above a comfortable height for every load. Ergonomics beat floor plans over a ten-year ownership period.
And if you have the width for side-by-side, that is usually the better setup: a folding counter, easier service access, no lifting, and no stacking kit. People stack because they must, not because it is superior.
Where to put one
The spaces that work share one thing: somewhere nearby to deal with the laundry once it is out.
Laundry closet. The classic application and what these machines were designed for. Mind the door, the depth, and the air openings.
Bathroom. Plumbing is already there, which saves high cost. Humidity is the trade-off, and a dryer adds to it. Ventilation matters more than usual here, because a poorly ventilated bathroom with a dryer in it is an invitation to the problems covered in our guide to cleaning and preventing mould.
Kitchen or utility room. Works well where cabinetry can be planned around it. A compact pair fits into a tall cabinet run neatly, and the thinking in our guide to modern kitchen cabinets applies to building a surround that looks intentional.
Basement. Space is rarely the issue down there, but moisture is. A basement laundry wants a dry slab and decent ventilation before anything else; the sequencing in our basement guide covers why that comes first.
Hallway cupboard. Viable with a compact pair. Noise is the consideration, since hallways tend to sit next to bedrooms.
Upper floor. Convenient and increasingly common. Vibration and the consequences of a leak both argue for a drain pan under the washer. A failed hose above a finished ceiling is an expensive morning, and the aftermath is the kind of thing our guide to cleaning hardwood floors exists for.
Making the space work
A laundry closet is mostly a storage problem once the machines are in.
Build upward. The space beside a stack is usually dead, and a narrow cabinet run or shelving there holds detergent, pods, and spare linen without taking floor space; the same approach is covered in our guide to laundry room cabinets.
A shelf above a compact stack is often feasible where it would not be above a full-size one. Measure before promising yourself one.
Keep the floor clear. Anything stored at floor level around a washer is in the path of a leak, and a stack already limits access for mopping up. The same storage discipline that works in a bathroom cabinet applies here: nothing absorbent at floor height.
Light it properly. Laundry closets are almost always under-lit, and sorting whites under a single dim bulb is a small daily irritation that is cheap to fix.
If the machines sit in a visible space rather than a closet, a cabinet surround or a sliding door conceals them. Built-in joinery around a stack reads as deliberate in a way a freestanding pair in a hallway never does.
What it costs
Ranges for planning, not quotes.
| Item | Typical range |
|---|---|
| Compact stackable pair | $1,200 – $2,200 |
| Full-size stackable pair | $1,400 – $3,000 |
| Premium/heat pump pair | $2,500 – $4,500 |
| Laundry center | $1,100 – $1,800 |
| All-in-one combo | $1,200 – $2,500 |
| Stacking kit | $30 – $100 |
| Professional installation | $100 – $250 |
| New 240V circuit | $300 – $800 |
| New vent run | $150 – $500 |
| Anti-vibration pads | $20 – $40 |
| Drain pan | $30 – $80 |
The costs people forget are the circuit and the vent. If the closet has never held a dryer, assume both until an electrician tells you otherwise.
Gas versus electric is a running-cost question that depends entirely on local utility rates. Gas dries faster almost everywhere; whether it is cheaper depends on where you live.
Five mistakes worth avoiding
Assuming a top-loader can be stacked. It cannot. This is the expensive one, because it changes the purchase from one machine to two.
Measuring the ceiling instead of the shelf. The lowest obstruction sets the limit, and installation headroom is a separate number again.
Forgetting the vent elbow in the depth. Six inches behind the machine, and a closet that measures exactly right on paper does not fit.
Mixing brands or improvising a kit. Unsafe, voids both warranties, and vibrates badly.
Ignoring control height. It is the complaint that outlasts every other consideration, and it is entirely predictable with a tape measure.
A buying sequence
Measure all seven dimensions before looking at a single product page. Width, finished height, installation headroom, depth plus hookups, door clearance, delivery path, and control height against the shortest user.
Confirm your hookups. 240V or 120V, three-prong or four, gas or electric, vented or not. Photograph the outlet and the standpipe.
Decide the format. Stacked pair if the height allows and you want independent machines. Laundry center if the height is marginal. All-in-one if the space is genuinely tiny and the household is small.
Choose the pair together, from one brand and one cabinet family, and order the matching stacking kit at the same time.
Book installation unless you have a second person and experience with the lift.
Test it before the crew leaves. Run a spin cycle at full speed and watch the stack. A problem is far easier to resolve while the installer is still standing there.
A stackable washer dryer is one of the few appliance decisions where the measuring is harder than the choosing. The machines are broadly similar; the space is where projects succeed or fail.
Twenty minutes with a tape measure, before you look at a single review, is the whole job.
FAQs:
Can you stack any washer and dryer?
No. Only front-load washers can be stacked, and the dryer must be a compatible match from the same brand and cabinet family, secured with that manufacturer’s stacking kit. Top-load washers cannot be stacked because the lid opens upward.
Do you need a stacking kit?
Yes, in practice. The kit is model-specific and usually sold separately. It stops the dryer from shifting during the spin cycle, manages vibration, and keeps warranty coverage intact. Improvised platforms or straps are unsafe and void coverage.
How tall is a stacked washer and dryer?
A full-size 27-inch pair stacks 74 to 80 inches tall with the kit installed. A compact 24-inch pair stacks 67 to 70 inches. Measure to the lowest obstruction, and leave extra headroom to lift the dryer into place during installation.
How much space do you need behind a stackable washer and dryer?
About 5 to 6 inches. The machine body is 31 to 34 inches deep on a full-size unit, and the vent elbow plus water hookups add roughly 6 inches behind that.
Can a stackable washer and dryer go in a closet?
Yes, and that is the main use case. You need an opening of roughly 30 to 33 inches wide, sufficient depth including hookups, and around 50 inches of clear floor in front for the doors. A closet door needs air openings at the top and bottom.
Is a stackable washer dryer worth it?
It is worth it when floor space is the binding constraint, and you have vertical room. If you have the width for a side-by-side pair, that generally means a better building counter, easier service access, and no lifting wet laundry overhead.
What is the difference between a stackable pair and a laundry center?
A stacked pair is two independent appliances bolted together, so one failure means replacing one machine. A laundry center fuses a small washer and dryer into a single cabinet; it is shorter at 70 to 76 inches, but a single failure can disable both halves.
Do ventless dryers work well?
Yes, and they are the only option where outside venting is impossible. Heat pump models are efficient and gentle on clothes. The trade-offs are longer cycle times and a higher purchase price, plus the need to plan for condensate drainage.