

General information, not professional advice. Prices, slab sizes, and support rules vary by stone, fabricator,r and region, so follow your fabricator’s written instructions and the stone’s manufacturer’s guidance.
The short answer
A granite installation happens in a set order: choose the stone, prepare the cabinets, make a template, fabricate the slabs, install and join them, then seal and connect the plumbing. The installation day itself is often quick. The planning before it decides whether the result lasts.
The typical project costs about $3,250, with most homeowners spending $2,000 to $4,000, according to HomeAdvisor. Material usually runs $40 to $60 per square foot, and labour adds more.
The mistakes that crack granite are rarely about the stone. They are about unlevel cabinets, unsupported spans, and overhangs that go too far.
Know what you are installing
Granite is a natural stone, quarried in slabs and cut to your counter. That means every piece differs, and you choose from the actual slab, not a sample.
It is heavy. HGTV’s installation guide notes that a six-foot countertop can weigh over 400 pounds, which is why slabs are carried on edge in an A-frame rack and why helpers are essential.
It is hard, and it is porous. HomeAdvisor says granite should be sealed about once a year, so sealing is part of the long-term plan, not a one-off.
Thickness comes in two common sizes. 2 centimetre slabs are cheaper and need a plywood sub-top for strength, while 3-centimetre slabs are stronger and can have their edges shaped without extra support.
One pricing guide lists 3 cm slabs at $80 to $140 per square foot against $50 to $80 for the thinner 1 to 2 cm range. Prices vary widely by stone and supplier.
What a granite installation costs
Cost sources differ, so read these as ranges to compare against your own quotes.
HomeAdvisor puts the average project at about $3,250, with a typical range of $2,000 to $4,000. Small jobs run around $500 and high-end ones reach about $9,000.
Materials usually cost $40 to $60 per square foot, with specialty granite costing more. Darker stone generally costs more than lighter stone. The page gives Alaska White at about $35, Black Galaxy at $50 to $70, and Blue Louise at $70 to $100 per square foot.
Labour is charged at $35 to $85 per hour, or about $35 per installed square foot. A separate pricing guide quotes professional installation at $45 to $100 per square foot,t including labour.
| Item | Typical cost |
|---|---|
| Average project | About $3,250 (range $2,000 to $4,000) |
| Material | $40 to $60 per sq ft (specialty stone more) |
| Labour | About $35 per installed sq ft, or $35 to $85 per hour |
| Sink cutout | About $100 |
| Cooktop cutout | About $200 |
| Old countertop removal | $100 to $200, or $4 to $7 per sq ft |
| Honed finish | Adds about $10 to $20 per sq ft |
| Leathered finish | Adds about $15 to $25 per sq ft |
Edge profiles add cost too. One guide prices eased edges at $5 to $15 per linear foot, bullnose at $15 to $,30 and ogee at $25 to $50, with custom profiles from $60 to $120.
Delivery and disposal can add to the bill. The same guide lists delivery at $200 to $500 and removal and disposal at $300 to $600, though your fabricator may bundle these.
Be careful with the extremes. That guide lists sealing at $15 to $35 per square foot, which looks far below the roughly $100 for professional sealing that HomeAdvisor gives, so I did not rely on it. Ask each bidder what sealing costs.
Add a cushion. Cabinet reinforcement, leveling, and plumbing reconnection can raise the total.

Decisions to make before you order
The choices you make early cannot be changed once the slab is cut.
Pick the stone from the slab, not a small sample. Veining, colour, and pattern vary across a slab, and you want to see where your pieces will come from.
Choose the edge profile. Eased and beveled edges are simple and cheaper, while ogee and custom profiles cost more and take more fabrication.
Decide on the sink. An undermount sink is attached to the underside of the stone, and the fabricator cuts clip grooves for it. A mechanic’s guide notes you should ask for the cutout to be reinforced with steel or fibreglass rods.
Plan the faucet and the cooktop. Cutouts are marked on the template, so the sink and cooktop models must be chosen before templating.
Think about seams. Veined stone helps hide them, and an experienced fabricator will place them over well-supported parts of the cabinets.
Check the height. A standard cabinet gives a counter about 36 inches high, and bar areas often sit near 42 inches. Islands may be lower.
If you are still choosing between materials, the PorcelPave guide covers porcelain as another hard, stone-look surface and what its installation demands.
A realistic timeline
Knowing the sequence helps you plan the rest of the kitchen around it.
First comes the choice of stone and fabricator. Allow time to visit yards, view slabs,bs and compare quotes, because this stage is where most of the money is decided.
Next, the cabinets go in, along with any appliances that sit beside the counter. Templating cannot start until they are fixed in place.
Templating takes a visit of an hour or two. After that, a contractor guide says to expect up to two weeks for fabrication and installation, though your shop may be faster or slower.
Installation day is usually a few hours for an average kitchen. The crew brings the slabs, dry-fits them, joins the seams, and fastens the stone.
Then the plumber connects the sink and faucet, and the backsplash goes up. Painting and final touches come last.
Plan for a kitchen with no sink for a short time. Set up a temporary wash area and keep takeout menus handy. A granite installation rarely takes longer than the surrounding work, but it does interrupt daily routines.
Get the cabinets ready
The cabinets are the foundation of a granite installation. Stone does not bend, so it exposes every flaw below it.
Cabinets must be flat, level, and well anchored. An installation guide says they should be sturdy, because slabs are heavy, and that a stone countertop will crack if it sits on a rocking frame.
Check level along the full length. If the cabinets are not level, unfasten them and shim beneath the cabinet or baseboard, not under the stone, since shims under the countertop can cause cracks.
Keep unsupported spans short. HGTV’s guide advises keeping unsupported spans under 2 feet, so add support where the cabinet layout leaves a gap.
Look at the corners and the dishwasher. A gap beside a dishwasher or a cutout leaves a weak, unsupported area, so ask the fabricator how the stone will be supported there.
Order matters. A contractor guide says countertops go in late: cabinets, appliances,s and fixtures should be fixed in place first, because nothing can move between the template and the installation.
Have the sink and the sink cabinet on site before templating, so the cutout matches the real parts.
Templating
The template is a precise pattern of your cabinets, and the slab is cut from it. An error here becomes an error in stone.
Fabricators use thin plywood strips glued together, or laser or photogrammetry methods. The result must match the walls, which are rarely straight.
A good template marks the sink, cooktop,op and faucet cutouts, the overhangs, the seam locations, and the walls. It also notes bump-outs and exposed pipes.
Do not move anything after templating. If cabinets shift, a wall is changed, or a sink model is swapped, the slab may no longer fit.
Walk through the layout with the fabricator before they leave. Confirm seams, overhangs, and edge profiles in writing.
After templating, expect fabrication and installation to take up to two weeks, according to the contractor guide. Your fabricator’s schedule may differ.
Overhangs and support
This is where a granite installation most often goes wrong. An overhang that looks fine can fail under load, usually from someone leaning or sitting on it.
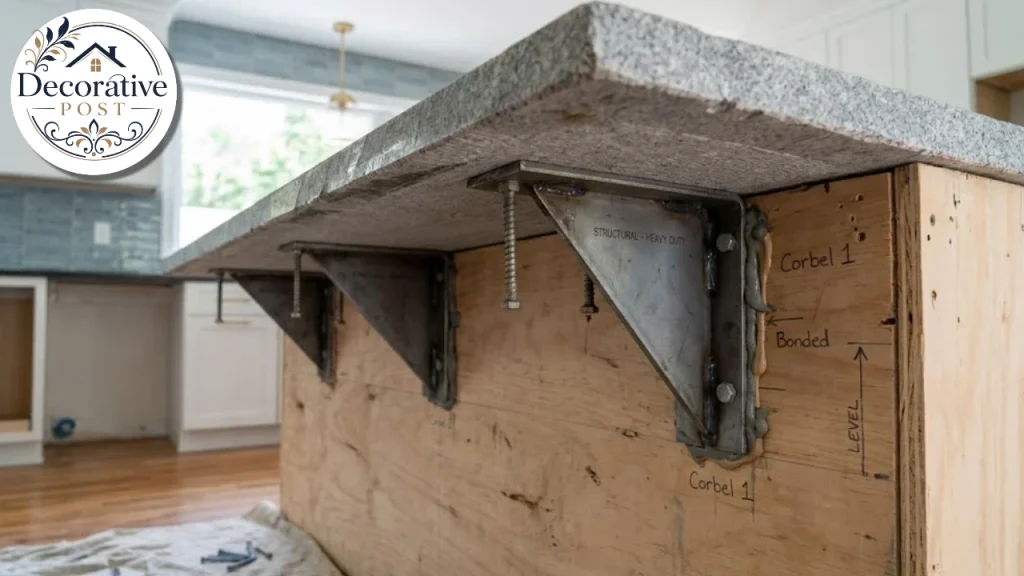
Industry guidance gives these limits. For 3/4 inch (2 cm) stone, the cantilever should not exceed about 6 inches. For 1.25 inch (3 cm) stone, it should not exceed about 10 inches. For any thickness, the cantilevered portion should never exceed one third of the countertop width.
HGTV’s guide gives similar numbers: limit overhang to 6 inches for 2 cm stone and 9 inches for 3 cm stone. Treat these as ceilings, not goals.
Beyond those limits, add support. One guide says overhangs beyond 12 inches need brackets, corbels,s or legs.
It gives bracket sizing from rules it attributes to a trade association.
For 12 to 16 inches, steel corbels at least 10 inches long, spaced no more than 24 inches apart. For 16 to 24 inches, 16-inch corbels spaced 18 to 24 inches apart. Beyond 24 inches, a leg or post at the outer edge is usually required.
That guide is from a software vendor, and I could not verify its cited sources, so use it as a starting point and ask your fabricator for their spec.
The industry advice is to support cantilevered stone with corbels rather than rely on the overhang alone. Corbels are described as a safer choice than brackets or hidden fixings into the slab.
Two cautions matter. Standing on a cantilevered section is never acceptable. And hanging heavy loads, such as a child’s seat, from a cantilevered edge is not recommended, even with corbels.
For an unusual layout, such as a long peninsula or a stacked island, ask for a structural engineer who works with natural stone.
Delivery and handling
Slabs are heavy, brittle along thin sections,s and easy to chip. Plan the route into the house before delivery day.
Measure doors, hallways, and turns. Remove obstacles, protect floors and clear a path to the kitchen.
Carry pieces upright on edge, never flat. HGTV’s guide recommends an A-frame rack and painter’s tape on the edges.
Do not carry a piece by the sink cutout. Cutouts are the weakest part of a slab, and most breaks happen there.
Use helpers. The weight and the awkward shape mean at least two or three people for most pieces, and professionals bring a crew and equipment for that reason.
If you are installing pieces yourself, wear gloves, eye protection, and sturdy shoes. Lift with your legs and keep your fingers clear of the edges.
The installation, step by step
The sequence below follows common practice and the tutorials I reviewed. Your installer’s method may differ in the details.
Dry-fit. The slab is set on the cabinets without adhesive to check the fit. HGTV’s guide says weak areas like cutouts should be supported during this step, and that no extra substrate is needed for 3 cm stone.
Adjust the fit. If the stone does not sit flush against a wall, the installer may recess drywall or grind the edge of the granite, depending on the wall material.
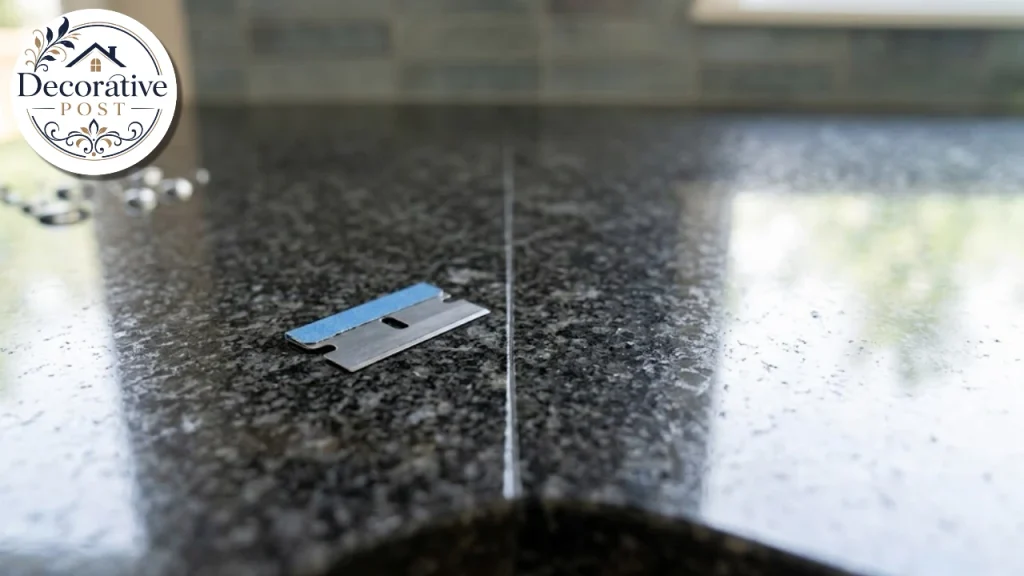
Join the seams. The seam edges are taped and filled with a colour-matched two-part epoxy that acts as both adhesive and filler. A seam setter clamps the slabs, and the installer runs it until the edges stay flush while the epoxy sets.
The tutorial places the seam setter about 1.5 inches from the seam, and shaves excess epoxy with a single-edge razor once it has cured.
Check the seam. One guide suggests drawing a razor blade across the seam. If the edge catches, one piece sits too high. It also warns that grinding a seam flat later usually leaves a dull patch, since factory polish is hard to match.
Secure the stone. A bead of acrylic caulk or construction adhesive along the underside perimeter holds the stone to the cabinets. HGTV’s guide says to avoid silicone, which can wick into the stone and stain it.
Install the backsplash. A contractor guide says the backsplash goes in after the countertop. Pre-fab counters often have a polished back edge that can be cut lengthwise and used as a matching backsplash.
For ideas on the surface above the counter, see the kitchen backsplash guide.
Connect the plumbing. The plumber connects the faucet and drain after everything else is installed.
Seal. Granite is porous, so apply a sealer after the epoxy has cured and the excess has been shaved off.
Paint last. The same guide puts painting after the backsplash is in.
A fabricator’s crew will do all of this for you in a few hours. The point of knowing the steps is to understand what to expect and what to ask.
Sealing and aftercare
Sealing protects the stone from stains. It does not make granite stain-proof, so wipe spills promptly.
HomeAdvisor says granite should be sealed about once a year. Some stones need it less often, so ask your fabricator which sealer they used and when to reapply.
Apply sealer with a soft cloth for full coverage, and let it dry for about 24 hours, according to HGTV’s guide. Follow the product label.
A simple test helps. Put a few drops of water on the surface. If it soaks in and darkens the stone, the sealer has worn off.
Clean daily with a granite-safe cleaner or mild soap and water. Avoid harsh acids and abrasive powders, which dull the finish.
Use trivets for hot pans and a cutting board for knives. Granite is tough, but a thermal shock or a heavy impact can chip an edge.
For the rest of the room, a clean window helps a stone kitchen feel bright, and the window cleaning guide covers streak-free methods.

DIY or hire a pro
Some people do their own granite installation, and a few tutorials show how. Most homeowners should not.
HGTV’s guide says DIY installation can save 20 to 30 percent over professional installation. Another pricing guide lists DIY costs at $10 to $35 per square foot for tools and materials, against $45 to $100 for professional installation.
The same guide stresses that DIY needs expertise, special tools,s and heavy lifting. A tutorial author who did a project in 2008 reports that a custom bid was $6,200, and that they saved by buying a pre-bullnosed slab and doing the work themselves.
The tools include an angle grinder with a diamond cut-off wheel, a stone router,er and contour diamond blades for sink openings. Dry cutting produces fine dust, so protect your lungs and the area around you.
The risks are real. A cracked slab is expensive, a poor seam shows every day, and a bad sink cutout can ruin a piece. Many fabricators will not warranty customer-installed stone.
If you want to save money, there are safer ways. Remove the old countertop yourself, which HomeAdvisor lists as a saving, and choose a polished finish and a lower-cost stone.
You can also handle the tasks around the install, such as clearing cabinets, protecting floors,s and painting after the backsplash.
For a custom stone-topped project like a bar or a laundry counter, the DIY built-ins guide explains how to build the base so it is strong and level enough for stone.
Choosing a fabricator and installer
The fabricator makes more difference than the stone. Two people can install the same slab and produce very different results.
Ask to see finished work, especially seams and sink cutouts. Look for tight, flat seams and clean edges.
Ask who templates and who installs. Some shops use their own crew, and others subcontract. You want the people who measured to install.
Get itemised written quotes that list the stone, edges, cutouts, seams, removal, delivery,y and installation. A vague quote hides extras.
Ask about the seam plan. Where will the seams go, how many, and how will they be placed relative to the sink and cooktop?
Ask about warranty and repair. A good shop stands behind its work and can repair chips and cracks.
Check insurance. A crew carrying heavy slabs through your home should carry liability coverage.
Compare at least three quotes. Prices vary widely, and the cheapest bid may leave out items that others include.
Granite in other rooms
The same principles apply beyond the kitchen, with a few differences.
Bathroom vanities are smaller and lighter, but the cutouts and sealing matter just as much. The small bathroom vanity guide covers sizing and layout for those spaces.
Bars and entertaining areas often use a stone top with an overhang for seating. That brings you back to the support rules above, because stools and elbows put load on the overhang.
The home bar ideas guide shows layouts, and a finished basement bar needs the floor and cabinets to be level before any stone goes on.
Laundry rooms and utility areas can use granite for folding counters. The stone must be fully supported across its span, with the washer and dryer sized into the template.
Outdoor kitchens need weather-resistant sealing and a structure that handles temperature swings. Ask your fabricator whether your chosen stone is suitable.
Questions to ask before you sign
A short list of questions protects you from most disappointments. A good shop answers them without fuss.
Where will the seams go, and why? Ask to see them marked on the template or a drawing before cutting starts.
How will the overhangs be supported? Ask for the thickness, the overhang length, and any corbels in writing.
Who templates, who installs,s and who handles problems? A single point of contact avoids finger-pointing.
What sealer do you use, and when should I reseal? The answer tells you how the shop thinks about long-term care.
What happens if a slab cracks or chips? A shop that stands behind its granite installation will explain its repair and replacement policy.
Does the quote include removal, delivery, and cutouts? Hidden extras are the usual reason one bid looks cheaper.
Common mistakes
Skipping the cabinet check is the most common. Stone on an unlevel base is likely to crack.
Moving cabinets or appliances after templating is the second. The slab is cut for the old layout.
Overhanging too far is the third. Respect the 6-inch and 10-inch guidance and add corbels beyond it.
Shimming under the stone instead of under the cabinets creates pressure points that crack the slab.
Using silicone to bond or seal the underside can stain the stone, according to HGTV’s guide.
Choosing a stone from a sample alone leads to surprises, because slabs vary.
Forgetting to seal leaves the stone open to stains.
Standing on a cantilevered section or hanging a heavy load from it risks a break.
What to take from it
A good granite installation is mostly preparation. Level the cabinets, template carefully, plan the overhangs, and choose a fabricator who shows their work.
Budget realistically. Expect roughly $2,000 to $4,000 for a typical kitchen, add extras for edges, cutouts, and removal, and keep a cushion for surprises.
Respect the support rules. They are simple, and they are what keeps the stone from cracking years later.
Seal the stone, clean it gently,y and use trivets and boards. Treat the stone as a long-term investment, and do those thin,gs and a granite installation will serve the kitchen for decades.
FaQs:
How much does granite installation cost?
HomeAdvisor puts the average project at about $3,250, with most homeowners spending $2,000 to $4,000. Material is usually $40 to $60 per square foot, and labour is about $35 per installed square foot.
How long does granite installation take?
A contractor guide says to expect up to two weeks after templating for fabrication and installation. The installation itself is often a matter of hours.
How much overhang can granite have without support?
Industry guidance gives about 6 inches for 2 cm stone and about 10 inches for 3 cm, and never more than one third of the countertop width. Beyond that, use corbels.
Do I need plywood under granite?
3 cm slabs generally do not need an extra substrate. 2 cm slabs usually need a plywood sub-top for strength.
Should I use silicone to install granite?
HGTV’s guide advises avoiding silicone because it can wick into the stone and stain it, and recommends acrylic caulk. Seams use a colour-matched two-part epoxy.
How often should granite be sealed?
HomeAdvisor says about once a year. A water-drop test shows when it is due: if water soaks in and darkens the stone, reseal.
Can I install granite countertops myself?
It is possible, and one guide says it can save 20 to 30 percent, but it needs special tools, heavy lifting,ing and skill. Most homeowners should hire a professional.
Why do granite countertops crack?
Common causes are unlevel cabinets, shims under the stone, unsupported spans, overhangs that are too long, and impact or heat. Most are installation errors.
What happens to my plumbing during installation?
The plumber connects the faucet and drain after the countertop is in place, so plan for the sink to be unusable for a short time.