

General information, not engineering advice. Building codes differ by edition and by jurisdiction, so check the code your local building department has adopted. If you see signs of movement, ask a structural engineer.
The short answer
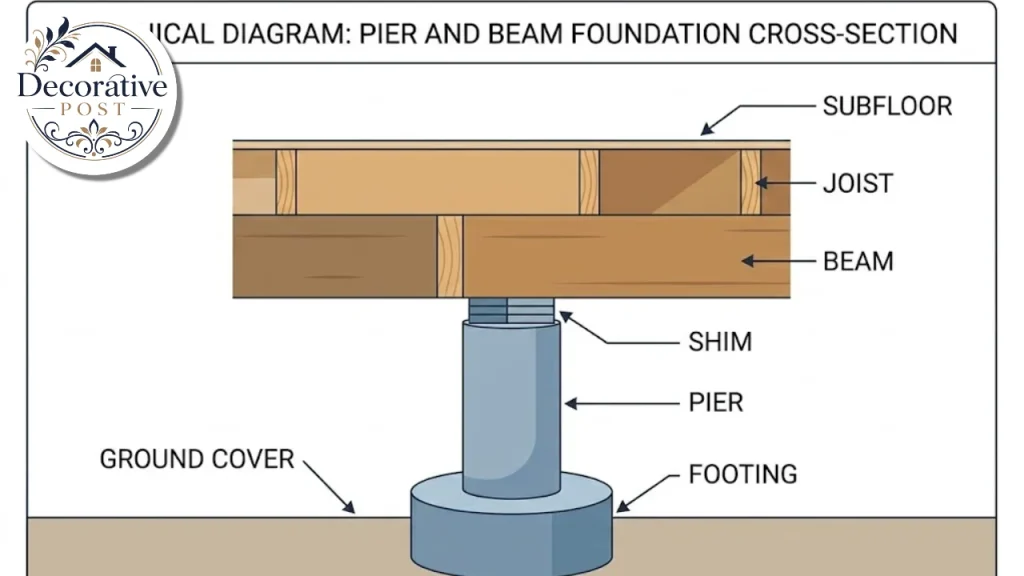
A pier and beam foundation lifts a house off the ground on a set of piers, with horizontal beams spanning between them and floor joists running across the beams. The result is a hollow crawl space under the floor, instead of a single slab of concrete.
That gap is the whole story. It makes plumbing and wiring easy to reach, keeps the floor above ground water, and suits sloping lots. It also traps moisture, invites pests, and lets the floor flex in ways a slab never does.
The foundation itself rarely fails suddenly. What fails is the damp, dark space underneath it, slowly, and usually where nobody looks.
How it is built, from the ground up
Reading the parts in order shows why each one matters.
Footings sit at the bottom. These are concrete pads that spread each pier’s load into the soil, ideally set below the local frost depth.
Piers stand on the footings. They may be concrete, block, brick, or steel, and in older homes, sometimes wood. Each one carries a share of the house’s weight at a single point.
Beams, also called girders, span from pier to pier. They are heavy horizontal members, often built up from several pieces of lumber, and they carry the joists.
Joists run across the beams and support the subfloor. The subfloor is the structural deck you eventually put flooring on, and loose subflooring is a common cause of squeaks.
Shims fill small gaps between the top of a pier and the beam, so the floor stays level. This is the part that matters most for repairs, because shims are cheap and they are what moves.
Around the perimeter, some homes have a continuous foundation wall. Others rely on piers with skirting enclosing the crawl space. A wood sill plate sits on top of the wall.
The height under the floor ranges from a couple of feet to nearly standing height.
A short history of the system
Before slabs became cheap and fast to pour in the mid-twentieth century, nearly every house stood on piers or a continuous wall with a crawl space. Many of those homes are still standing, which says something about the design.
Older houses often sit on wood or brick piers, and some have no vapor protection at all. A pier and beam foundation from that era can be sound after a century if the wood stayed dry.
That history shapes how you assess one. Age alone is not a defect, but old piers, hand-cut beams, and long-gone ground cover mean the crawl space deserves a closer look than a house built last year.
Where and why builders choose it
This is not a niche system. Pier and beam was widespread before about 1950, and it remains common where a slab is a poor fit.
It suits sloped lots because the piers can vary in height to follow the ground. It suits flood-prone areas, because the floor sits above ground level. And it suits areas with deep frost lines, because concrete must sit at least a foot below the frost line, which makes deep slab excavation costly.
The access is the daily-life advantage. With a crawl space, a plumber can reach the pipes without cutting a floor, and an electrician can run new circuits from below.
Resale is mixed but often positive. Many buyers like the raised look and the access, though results vary with local norms.
Pier and beam versus slab
The two are best compared on what they cost to build, what they cost to live with, and how they fail.
| Pier and beam | Slab | |
|---|---|---|
| Typical cost to build | About $6 to $15 per sq ft | About $4 to $14 per sq ft |
| Access to plumbing and wiring | Easy, from below | Hard, through concrete |
| Moisture and pests | Higher risk | Lower risk |
| Energy efficiency | Lower unless insulated | Naturally better insulated |
| Repairs | More frequent, but cheaper per fix | Fewer, but costly when they come |
| Sloped lots and flood zones | Well suited | Poorly suited |
| Storage | Space under the house | None |
The cost figures are Angi’s, quoted for a typical footprint, and they overlap enough that cost alone rarely decides it. Angi puts the lifespan of both at roughly 50 to 100 years, averaging about 75 with maintenance.
The point to take is that neither is better in the abstract. Pier and beam trades convenience and flood protection for ongoing attention to the space underneath.
The crawl space is the whole story
Almost every problem with a pier and beam foundation begins as a moisture problem, so it is worth understanding what keeps a crawl space healthy.
Moisture comes from three places: bare soil that evaporates water upward, poor drainage that sends water toward the house, and leaking plumbing. All three feed rot, mould, insects, and a cold, clammy floor above.
Wood needs to stay dry to survive. A National Association of Home Builders technical note says wood moisture content should stay below about 20 percent to prevent decay.
Indoor humidity matters too. One inspection guide recommends keeping indoor relative humidity below 60 percent, and ideally between 30 and 50.
That is why cooling strategy matters. NAHB’s guidance warns against relying on overcooling to dehumidify, and recommends sizing the air conditioning correctly, because an oversized system leaves the air damp. The guide to BTU sizing explains the mechanism.
Ventilation: the rules and their limits
The model building code gives two main ways to manage a crawl space, and the right one depends on your climate and how the space is built.
The traditional approach is a vented crawl space. The 2024 International Residential Code, in Section R408, calls for 1 square foot of net free vent area for every 150 square feet of crawl space floor area.
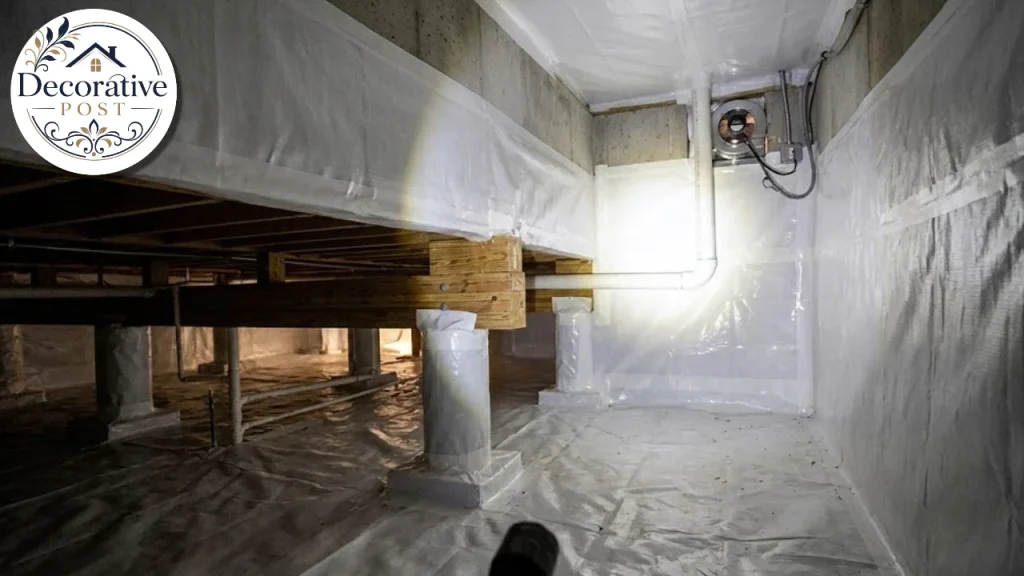
With a continuous Class I vapor retarder covering the exposed earth, that drops to 1 square foot per 1,500. The ground cover must be a minimum 6-mil polyethylene or equivalent, and partial coverage does not earn the reduction.
For a 1,300 square foot crawl space, the base ratio means about 8.7 square feet of vent. With the ground cover, it falls to about 0.9 square feet.
Vents must be placed so air moves across the whole space.
One summary calls for a vent within 3 feet of each corner, and for no point to be more than 3 feet horizontally from a vent. Openings may not exceed a quarter inch, and screens can cut the net open area by up to half, so use the manufacturer’s net free area, not the size of the frame.
The alternative is a sealed, unvented crawl space.
The code allows it when a continuous Class I vapor retarder covers all exposed earth, laps at least 6 inches at the seams and runs at least 6 inches up the walls, and the space is conditioned. Conditioning can mean continuous mechanical exhaust or supply air at 1 cubic foot per minute per 50 square feet, or dehumidification.
Two cautions apply. Sources differ on details such as seam overlap, which one source gives as 6 inches and another as 12, so use the figure in the code your jurisdiction has adopted. And vented crawl spaces are not automatically dry: in humid climates, outdoor air can bring moisture in.
Clearances and access, in numbers
The code sets minimum distances between wood and the ground, because wood that stays close to damp soil decays.
Under Section R317.1, floor joists and wood structural floors need 18 inches of clearance from the ground. Girders and beams need 12 inches, and columns need 8.
Where framing is closer than that, it must be preservative-treated or a naturally durable species. Pressure-treated wood rated for ground contact can reduce those distances, though the sources I read did not give the reduced figures.
Access matters as much as clearance. A floor access opening must be at least 18 by 24 inches, and a perimeter wall opening at least 16 by 24 inches.
If the crawl space holds a furnace or other equipment, the code adds a rule.
It requires a passageway at least 30 inches high and 22 inches wide, extending no more than 20 feet from the opening, with a level working area of at least 30 by 30 inches at the service side. Lighting outlets in a crawl space require GFCI protection.
Inspectors work to a lower bar. Under the ASHI standard cited by one inspection guide, they need not enter a crawl space with less than 24 inches of vertical clearance or an opening smaller than 16 by 24 inches, and the report should say so.
Keep that in mind when you buy. A clean inspection report on a house whose crawl space was only viewed from the hatch is not the same as one that covers the whole space.
Floors that bounce, flex and creak
A floor on joists over open air will always move more than a floor poured on the ground. Some of that is normal, and some is a warning.
Building experts cited by one flooring guide say a floor may deflect up to 1/360 of its span. On a 12-foot span, that is about three-eighths of an inch.
Bouncing beyond that points to a cause: pier movement, beams that are undersized or span too far, or joists that were notched for pipes. Sudden new creaking can mean shims have settled or loosened.
The flooring you choose has to tolerate that movement.
A source that rates materials out of ten scores luxury vinyl plank highest at 9, followed by engineered hardwood and cork at 8, laminate at 7, solid hardwood at 6, and tile at 5. Those scores are that site’s opinion, but the logic is sound.
Solid hardwood is prone to seasonal gapping and moisture damage. Tile can crack if the house settles, so the guide recommends an uncoupling membrane such as Schluter-DITRA so the tile and subfloor can move independently. Laminate can swell at the seams if water gets in.
Prepare the subfloor before anything goes down.
The guide calls for flatness within 3/16 of an inch over a 10-foot radius for most flooring, with a 1/4 to 1/2 inch layer of underlayment plywood to spread loads. For wood floors, it cites the National Wood Flooring Association advice to keep subfloor moisture within a few percentage points of the flooring’s own.
If you are weighing vinyl, the guide to LVP flooring covers how a waterproof floating floor interacts with moisture below, which is especially relevant over a damp crawl space. Rugs help with cold floors, and the way a living room is laid out shows where they do the most good.
Cold floors and insulation
An uninsulated floor over an open crawl space is the main reason these houses feel cold underfoot.
NAHB’s technical note on floors above crawl spaces cites minimum floor insulation of R-13 in climate zones 1 and 2, and R-19 in zone 3. Floor insulation must stay in permanent contact with the underside of the subfloor, with limited exceptions.
Where the vapor retarder goes matters. If one is used, it belongs on the crawl space side of the floor insulation, and the least permeable layer limits how fast the floor can dry upward.
The note pairs materials carefully. Permeable insulation suits permeable floor coverings, and an impermeable covering over permeable insulation is marked “not recommended.” That is the sort of detail that causes trouble when someone lays a waterproof floor over fibreglass batts in a damp crawl space.
Foam insulation in a crawl space also needs a thermal or ignition barrier under the code, and insulation should not block pest inspection.
On the heating side, the cold floor is part of the load. The BTU guide explains why a leaky, uninsulated room needs more than the standard rule of thumb.
Radon belongs in this conversation
Crawl spaces are a recognised path for radon, and a house on piers is not immune just because the floor is raised.
The standard fix is different from a basement’s. A basement system pulls suction under a concrete slab, but a crawl space usually has bare soil or a thin, leaky cover. So the approach is to create a sealed surface first, then depressurize beneath it, a method called sub-membrane depressurization.
A certified installer covers the floor with a heavy polyethylene liner, seals the seams and the walls, runs a perforated pipe beneath it, and exhausts soil gas above the roofline with a fan. The seal is the most important factor, because gaps let the fan pull crawl-space air instead of soil gas.
The action level is 4.0 picocuries per liter. One guide puts a typical crawl space system at roughly $1,500 to $3,500 or more.
The full mitigation story, including testing and the manometer check, is in the radon mitigation guide.
What goes wrong
Four problems account for most of the trouble, and they often arrive together.
Moisture and rot come first. Rot concentrates at sill plates, at beam ends resting on masonry,y and at joists near leaks, and it weakens framing enough to cause sagging.
Insects follow the damp. Termites are the headline pest, and carpenter ants and other wood-boring insects also feed on wet timber. Open vents and damaged skirting let animals nest under the house.
Settling or heaving piers come next. Causes include undersized or shallow footings, loose fill, water undermining the soil,il and expansive clay that swells and shrinks.
Failing shims are the fourth. Crushed, rotted, or loose shims let the floor drop, and repeated shimming at the same pier suggests the pier itself keeps moving.
Who should do the work?
Reshimming and minor repairs are done by foundation specialists, while rot and framing repairs may be handled by a general contractor or carpenter. For anything involving piers or beams, ask for a written scope that says how many piers, what material,l and how deep.
Ask each bidder how they will level the house and over what period. A contractor who plans to lift the floor in one visit is a red flag, given the risk to plaster and plumbing.
A good estimate names the cause, not only the cure. If water pooled under the house, the plan should include drainage, or the new piers will sit in the same wet soil that moved the old ones.
Get at least three quotes, ask for proof of insurance, and keep photos of the work before it is closed up. Those photos help at resale, when a buyer’s inspector asks what was done under a pier and beam foundation and when.
Signs you should act
Inside the house,e the symptoms are visible. Uneven or sinking floors, cabinets pulling away from walls, large drywall cracks around doors and windows, sticking doors, gaps at baseboards,ds and a musty smell all point to something below.
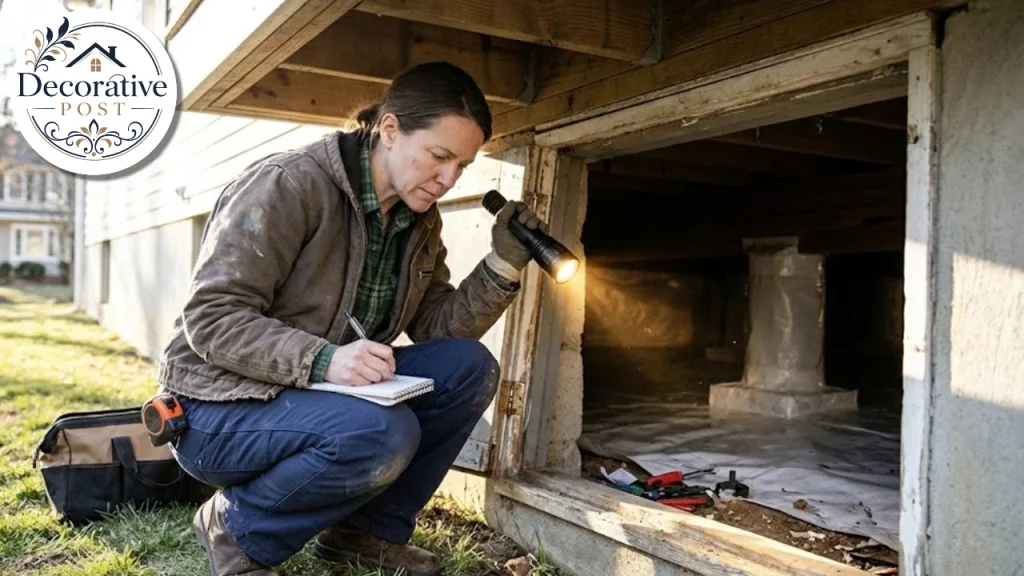
Underneath, an inspector looks for leaning or cracked piers, missing or loose shims, rot or insect damage, sagging beams, moisture, a missing vapor barrier, debris, pest activity,y and plumbing leaks.
Do not ignore small signs. A new creak or a door that starts to stick is usually the first evidence that something has shifted.
What repairs cost
Repair costs vary widely, and sources disagree. These figures come from Angi’s pier and beam repair guide.
| Repair | Typical cost |
|---|---|
| Reshimming | $1,200 to $4,000 (average about $1,600) |
| Adding new piers | $800 to $4,000 each (average about $2,000) |
| Replacing piers | $2,000 to $6,000 each (average about $3,000) |
| Replacing a beam | $400 to $1,200 per beam |
| Moisture barrier or waterproofing | $3,000 to $20,000 |
| Encapsulation | $12,000 to $20,000 |
| National average for a repair | About $10,000, with most $6,000 to $14,000 |
Another source puts individual piers lower, at several hundred to over a thousand dollars each, and quotes larger projects at $5,000 to $15,000 or more. Prices depend on access, region, and the contractor, so get several quotes.
Reshimming is the cheap fix, and it treats the symptom. It works when piers are stable, but shims have settled. When piers are failing, undersized, or spaced too far apart, they must be added or replaced.
Rotted sills, beams,s and joists are replaced or sistered, which means fastening a new member alongside the old one. Beam replacement is cheaper than pier work because it needs no excavation.
Leveling should be gradual. Lifting a house too quickly can crack plaster, rack door frames, and stress plumbing.
A structural engineer’s evaluation, which one source puts at several hundred dollars, is worth the money before a major repair. It separates a floor that needs reshimming from one that needs a new support system.
Buying a house on a pier and beam foundation
A pier and beam house deserves one extra step before you make an offer. Look underneath it.
Ask the inspector whether the whole crawl space was entered or only viewed from the hatch. Ask for photos of the beams, the piers,s and the ground cover.
Look for standing water, damp soil, a missing vapor barrier, damaged insulation,n and signs of past repairs. Ask the seller about flooding, previous leaks, and any foundation work, with receipts.
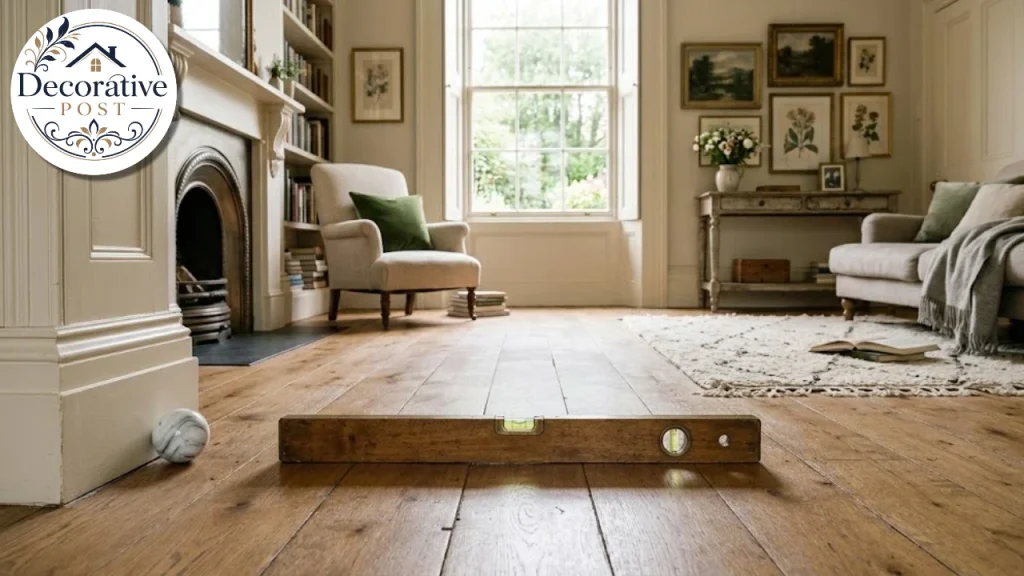
Inside the house, walk the floors. Put a marble down in a few rooms, look at door gaps, and check cabinets against walls.
If anything looks off, a structural engineer’s report before closing is cheap insurance.
A yearly maintenance routine
This is a short job done once or twice a year, and it prevents most of what is above.
Grade the soil so it slopes away from the house, and keep gutters and downspout extensions working. Keep plants and mulch away from the foundation wall.
Look into the crawl space for water, damp soil, droppings, nests,s and sagging insulation. Check that the ground cover is intact and that vents are clear.
Fix plumbing leaks promptly, because a slow drip under a bathroom floor is the classic source of localised rot. Keep skirting intact, and openings closed to deter animals.
Watch indoor humidity, and be mindful of what you add. Laundry dried indoors adds moisture, which the guide to ventless washer-dryer combos covers. For persistent damp or mould, the shower mould guide explains the cleaning and ventilation side.
The mistakes that cost the most
Ignoring the crawl space for years because it is out of sight.
Reshimming the same pier repeatedly without asking why it moves.
Laying a waterproof floor over damp insulation and trapping moisture.
Sealing vents without a proper conditioning plan.
Leaving bare soil with no ground cover.
Buying on an inspection that only viewed the space from the hatch.
Lifting a sagging floor too fast.
Treating insect damage as cosmetic.
Climate changes the priorities

The same crawl space behaves differently in different places. In hot, humid climates, warm outdoor air can condense on cool surfaces under the house, so a vented space may stay damp all summer,r and a sealed, conditioned one often performs better.
In cold climates, the concern shifts to frozen pipes and cold floors. Insulation, sealed rim areas, and protected plumbing matter most, and a pier and beam foundation that was fine in a mild region may need upgrades after a move north.
In dry climates, rot is less common, but expansive clay soils can move piers as they swell and shrink. Drainage still decides the outcome.
Check what your local building department recommends. They know the soil, the frost depth, and which approach holds up in your area.
What to take from it
A pier and beam foundation is a good system with one requirement: someone has to look after the space underneath. Keep it dry, keep it ventilated or properly sealed, and keep it accessible, and it will serve a house for decades.
Most expensive failures start small and out of sight. A damp corner, a rotted sill, a shim that has crushed. Catch those early,y and the repair is a few thousand dollars, not a tear-down.
If you are buying, look underneath. If you already own one, spend an hour in the crawl space this season with a torch and a notepad.
A pier and beam foundation rewards the owner who keeps a flashlight by the hatch. Check it, fix small things,gs and keep the water out, and it will not surprise you.
FAQs:
What is a pier and beam foundation?
A foundation that supports the house on piers, with beams spanning between them and joists carrying the floor. It leaves a crawl space under the house instead of a concrete slab.
What are the pros and cons of pier and beam?
Pros are easy access to plumbing and wiring, good performance on slopes and in flood-prone areas, and storage space. Cons are moisture, pest risk, more frequent repairs, and lower energy efficiency unless insulated.
How much does a pier and beam foundation cost?
Angi puts new construction at about $6 to $15 per square foot, against $4 to $14 for a slab. Repairs vary far more, with a typical repair averaging about $10,000.
How much clearance does a crawl space need?
The model code calls for 18 inches below floor joists, 12 inches below beams,s and 8 inches at columns, or else treated or naturally durable wood. Access openings must be at least 18 by 24 inches through the floor.
How much ventilation does a crawl space need?
The 2024 IRC calls for 1 square foot of net vent area per 150 square feet of floor area, dropping to 1 per 1,500 with a Class I ground vapor retarder. A sealed, conditioned crawl space is an alternative.
What are the signs of pier and beam foundation problems?
Uneven or sinking floors, bounce, cabinets pulling from walls, large drywall cracks, sticking doors, a musty smell, and visible water or insect damage underneath.
How much does it cost to level a pier and beam foundation?
Reshimming typically runs $1,200 to $4,000, while replacing piers costs $2,000 to $6,000 each. The right fix depends on whether the piers are stable.
Can you have radon with a crawl space?
Yes. Radon can enter through the soil. The standard fix is sub-membrane depressurization, a sealed liner with a pipe and fan beneath it, and the action level is 4.0 pCi/L.
What flooring is best over a pier and beam foundation?
Flexible, moisture-tolerant options such as luxury vinyl plank and engineered hardwood are generally recommended. Tile needs an uncoupling membrane, and solid hardwood is prone to gapping.